Videoconferencing Tips for Presenters

Are you planning to use the new high definition videoconferencing equipment available in the Global Digital Classrooms?  This equipment allows classes to interact in real time no matter where they are located.  If you are presenting in a videoconferencing environment you might be interested in some advice from faculty experienced in working in this setting.  Dr. Dwight Daniel, Director of MSCIS, Assistant Professor of Computer Information Systems at St. Edward’s University, has developed some videoconferencing do’s and don’ts to help you get started.  Below are some highlights for presenters. A subsequent post will highlight tips for participants.

  • Do prepare in advance for the meeting.
  • Be aware that in a video conference you are on camera at all times even when you can’t see yourself – speak directly to the camera and treat the others as if they were in the room with you.
  • Speak in a normal tone.  Don’t shout or whisper.
  • Don’t make distracting sounds.
  • Don’t wear “noisy” jewelry.  Even a metal band on your watch banging on the table as you move will drive participants crazy if you are near a microphone.
  • Don’t carry on side conversations with your room audience.  It is discourteous to your remote listeners and can make them wonder what they are missing.
  • Be culturally sensitive.  For example, in some societies is it impolite to walk out of an ongoing meeting, no matter the reason.  In others, people should not lean back in chairs.
  • Be courteous to other participants (wait for the person to finish speaking before jumping in).
  • Be yourself and have fun!

Visit the St. Edward’s University Global Digital Classrooms website for more information on videoconferencing.

Complete Video Conferencing Do’s and Dont’s from Dr. Dwight Daniels.

Enhancing Your Presentations with the ‘Substitution’ Method

Substitution is a technique that addresses the phenomenon sometimes referred to as ‘Death By PowerPoint’. DBP occurs when a speaker reads his slides to the audience (very often word-for-word). While we’ve all endured DBP as audience members or students, it’s still difficult to avoid as a presenter. Particularly when the bulk of what we want to say is already on the slide, we end up in the position of either reading the slide to the audience or attempting to vary what we say to avoid reading. Either way, it can be very difficult to avoid DBP.

In an effort to address the issue of DBP, the “Substitution” method can be very helpful. Neuroscientists (and advertisers) have long known that our brains can associate complicated ideas with images and that images are often easier to remember. The Substitution method capitalizes on the same idea. What begins as a dense, text-based PowerPoint deck can be transformed into an engaging presentation that combines auditory and visual learning modalities to enhance learning and engagement.

Essentially, the steps are very simple. First, we copy the text of each slide and paste it into a word document. Next, we gather content that will allow us to replace the text of each slide with images, charts or infographics. Finally, we replace the text on each slide with relevant content. The net result is that we are able to read from the text of our earlier slides while simultaneously providing the audience with compelling imagery to maintain interest and aid in later recall.  You can see this technique demonstrated in the example below.

If you would like to learn more about this technique, feel free to contact one of the instructional designers in the FRC for more details.Slide1

Slide2

Speed Up Your Grading

3 Tips For Making the Blackboard Grade Book Easier to Use

In this Tech Snack on October 18, 2014 we demonstrated several easy steps that can help save you time and frustration while grading.

1. See All Your Students with “Edit Rows Displayed”

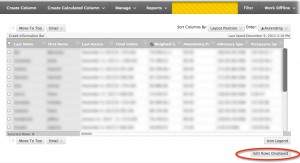
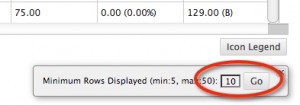
Blackboard defaults to showing you the first 10 students in your roster. If you want to see your entire roster of students, click on Edit Rows Displayed and select the number of students you have. This makes it much easier to see all of your students at the same time.

2014-02-06_14-14-54 2014-02-06_14-17-56

2. Minimize Scrolling through Assignments with “Column Organization”

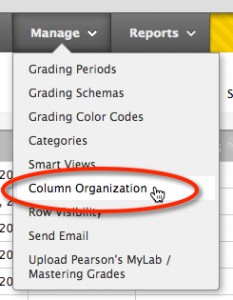
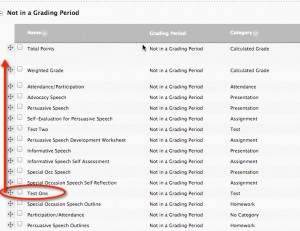
Blackboard also defaults to displaying the most recent grade book entry to the right of the existing entries. The column organization feature allows you to reorder your grade book display as you see fit. For example, you might want to display the most recent entry first. Managing your columns is a great way to minimize the need for scrolling.

2014-02-06_14-25-59            2014-02-06_14-26-49

3. Use Excel to Manage Grades via “Download Roster “

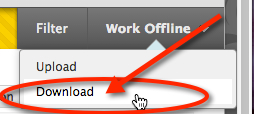
Blackboard allows Instructors to download a current version of their course grade book as an Excel file. Instructors can use this feature to manually enter grades into a spreadsheet and upload it to Blackboard again. Downloading the grade book is also a great way to create attendance charts and sign-in sheets quickly.

2014-02-06_15-01-15          2014-02-06_15-01-56


There are also a variety of video tutorials available on the Instructional Technology website.  Here’s a link to our BlackBoard Grade Book overview.

You Too Can Youtube!

Want a great way to reach your students in and out of the classroom? Create your own video content. Creating your own video content can help stimulate interest in subject material and reinforce what is being taught in the classroom. Instructors are able to share videos with future classes, reuse captured video material with other video projects, and make content available so students can have access to videos even after they have completed the course.

Creating video content has never been easier. With smart phones, tablets, and other mobile devices readily available that have the ability to record HD quality videos, you can quickly create and share video content directly to the web. Youtube offers a free browser-based video editor that allows users to edit video clips with several options that are commonly found in video editing software. The Youtube editor has plenty of features that allow users to create videos and has been updated to allow more precise editing. Some of the key features are:

  • splitting/trimming video clips
  • editing audio
  • adding an audio track
  • adding titles with backgrounds
  • adding annotations

Below is an overview of some of the major features available in the Youtube Editor:

Upload
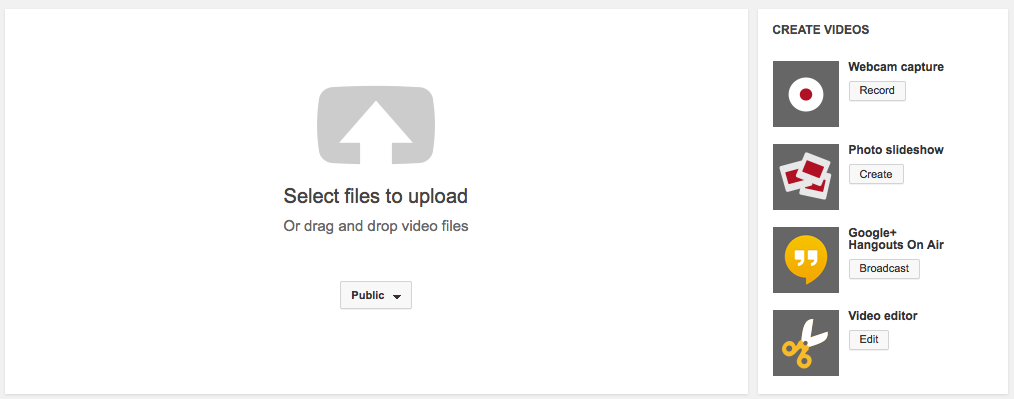
Once you log in to your Youtube account, click on the “upload” button located next to the search bar. The “upload” page will appear giving you several options to create videos. You can select video files located on your computer, record a video using your webcam, create a photo slideshow, broadcast a Google+ Hangout session or use the video editor. We will be focusing on the video editor features for this article.

Video Editor Interface
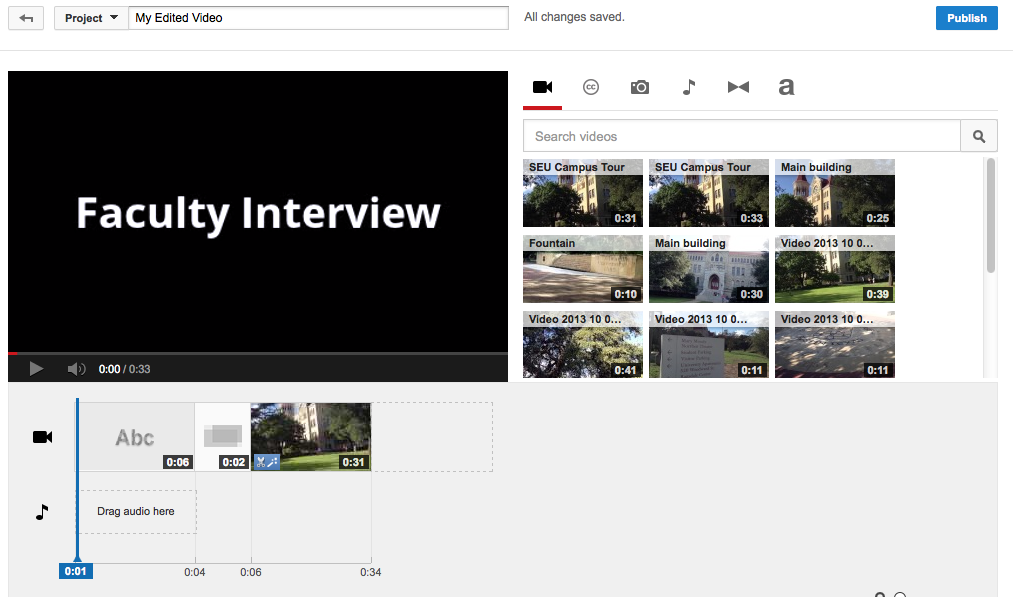
The video editor allows users to view the video clips that they have uploaded to Youtube (up to 55 clips) and edit them individually or together on a timeline. The main interface allows users to insert titles, edit clips together, add transitions and an audio track. Users will also be able to publish their edited video from this interface.

Quick Fix
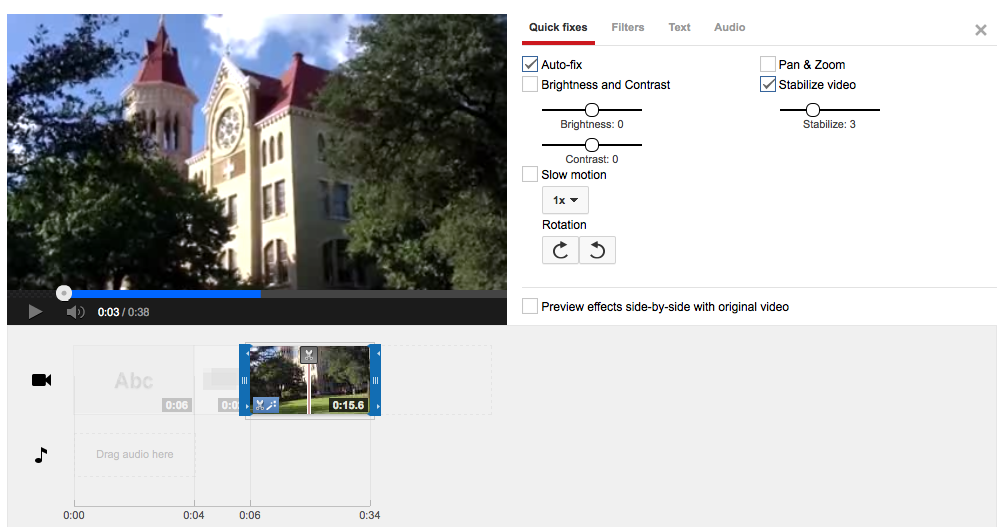
When a video clip is selected, users have the option to apply quick fixes to their video. Users can apply an auto-fix that automatically adjusts color, brightness and contrast. Users can also manually adjust brightness and contrast as well. Another great feature is the ability to stabilize the video clip. This helps remove the “shaky camera” effect when users are recording video without a tripod.

Filters
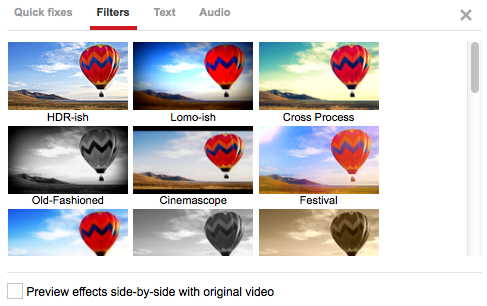
Users can apply several different filter effects on their video clips to alter the look of their video. These filters adjust color saturation and can give your video a new style or look.


Text

Text can be added over video clips or as title bumpers before a video clip. Users can adjust fonts, position, size, style, color and alignment.

Titles
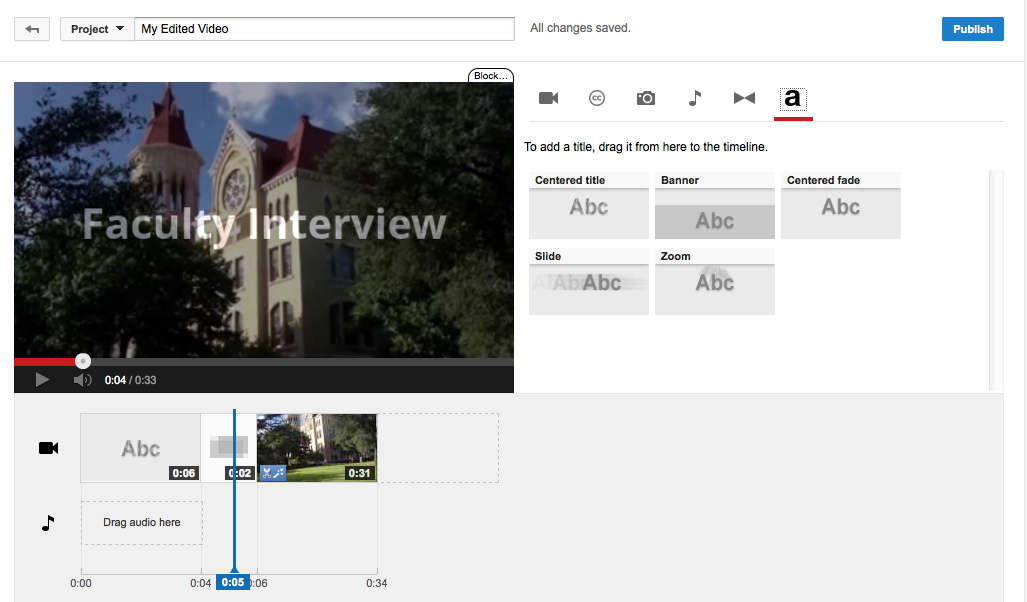
Titles can be applied before clips and transitions. Users can create titles by simply dragging a title style from the title tool directly to the timeline.


Transitions
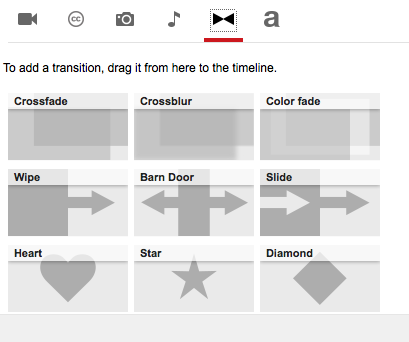
Users can also apply transitions between clips, images or titles. These effects will help transition between titles and clips.

Audio Track
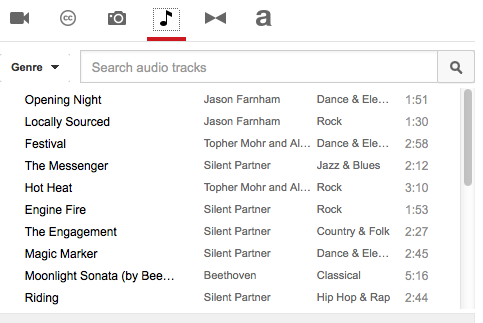
Another great new feature is the audio track tool. YouTube now offers a free audio library that has a collection of music tracks that users can download and feature as background music in their videos.


Here is a sample video that was created with an iPad and edited using the Youtube video editor.

Demo: SEU Campus Tour


Here are some other helpful resources on ways to use videos in education. Feel free to contact us here at the Faculty Resource Center if you have any questions regarding video production for your classroom. Good luck.

20 Ways to Use Video in the Classroom
http://www.mediacastblog.com/20-ways-use-video-classroom/

6 Simple Ways To Use Video In Education
http://www.edudemic.com/6-simple-ways-to-use-video-in-education/

Different Types of Videos Used for Education
http://56wrtg1150.wikidot.com/youtube-vodcasts-and-skype

Youtube Video Editor Support
https://support.google.com/youtube/answer/183851?hl=en-GB

Free music for your videos in Audio Library

https://support.google.com/youtube/answer/3376882?hl=en-GB&ref_topic=3014750
Build your Classroom Technology Toolbox

On September 24, Instructional Technology held a tech snack focused on free tools for classroom use.

What types of technology do you use in your classroom?

Do you need your students to complete their assignments with certain types of software? You can create your own technology toolbox  from cloud-based tools that are free to use and can benefit students both during the course and after. If you need training for yourself or your students on any of the software that is listed, please contact training@stedwards.edu with your request.

Classroom Management, Collaboration, and Productivity:

Social Bookmarking and Personal Research:

Web Based Presentation Tools

Free E-Books and Other Open Educational Resources

Website Development

Faculty Mobile Device Mixer

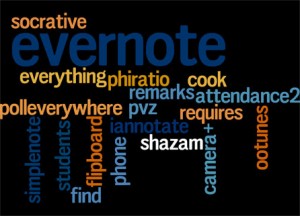
On September 20th Instructional Technology welcomed thirteen faculty, Center for Teaching Excellence staff and Library staff to our first Tech Snack for fall — “Mobile Device Mixer”.  We started off by using a mobile app Poll Everywhere to ask faculty to name their favorite app.  Poll Everywhere allows you to conduct a quick poll using any mobile device, including laptops.

Wordle with most popular app displaying as Evernote

Note Taking

No surprise that Evernote tops the list!  Evernote is a great productivity tool.  You can sync notes across multiple devices (Windows, Android, iOS).  You can sort notes into notebooks and tag them for easy searching.  Ann David shared an educational use for Evernote.  She uses Evernote for  Learning Logs for her Educational Technology class. Students make Evernote notebooks and share so she can see live what students are writing.  She can’t edit or make notes on their notebooks but she can give immediate feedback.  Students can include audio, images, and videos to record their experience.

File Management and Sharing

Ryan Hoover discussed the ease of using Google Drive across devices to share documents with students.  DropBox also has an app that lets you access files across devices.

Annotation and Reading

We had a lively discussion on tools to annotate PDFs or ebooks via mobile devices.  Annotation of PDFs and ebooks is still challenging for some students.  Julie Sievers shared her favorite, iAnnotate, which is available for iPads and Android devices.

Other apps we discussed:

  • Quip –  a shared word processor so everyone is editing the same document.  You can add photos to create a collective photo album.
  • TalkBoard – a shared whiteboard, great for creative projects
  • SimpleNote – a note application available on iOS and Androids
  • vBookZ PDF Reader — Reads PDFs to you — great for commuting in Austin!


Faculty Must-Have iPad Apps #1: Evernote

Evernote is a multi-purpose app.  First, it’s a simple tool for taking notes in a meeting or conference presentation.  Second, it’s a way to “clip” web pages, documents and images in much the same way as one would clip interesting articles from paper-based newspapers and magazines.

The above features are not necessarily unique.  However, Evernote is downloadable to each of your devices, from phones to iPads to desktops and laptops and synchronizes across all of them, which IS unique!  Essentially, this functionality allows you to create notes on one device that, when synchronized (automatically once an internet connection is detected), becomes available across all of your devices that have Evernote.  In many instances, this can eliminate the need to email documents and other information to yourself.

Evernote.com

Students, Faculty, and Staff Discounts on Microsoft Office 365 and 2013. What are your options?

St. Edward’s University students, faculty, and staff have the option to use VarsityBuys.com to purchase and download software products for personal use. Some of these products include Office 365 University for students, faculty, and staff, and Office Professional Plus 2013 for faculty and staff.

When it comes to deciding what software best meets your needs, you need to do the research, but we have already done that for you. It is up to you whether you want to subscribe (rent), purchase a license (own), or use an online free version of Microsoft Office. Shown below are the personal use options available for faculty, staff, and students:

Steps to Purchase Office 365 University for Students or Microsoft Office Professional Plus for Faculty and Staff

Visit VarsityBuys.com and select the Institution Type: College/University and then select the Country and State/Province as Texas and click on Go and select Saint Edwards University.  There, you may purchase and download the available software products for Students and Faculty/Staff.

Steps to Create a Microsoft Account and use and Download SkyDrive

First, visit https://signup.live.com to create a Microsoft account, and then visit outlook.com to sign-in using your Microsoft account and view email or select SkyDrive. To download SkyDrive to sync your files visithttp://windows.microsoft.com/en-US/skydrive/download.

Now that you know the various Microsoft Office options to choose from, you just have to decide which type works best for you. For more information and other references visit:

Ecycling is Available on Campus

Don’t produce electronic waste (e-Waste or e-Scrap). e-Waste can be defined as loosely, discarded, surplus, obsolete, or broken electrical or electronic devices, according to Round2 a national electronics recycling company that provides integrated and customizable electronics recycling services.

St. Edward’s University is working with Round2 to provide eCycling on campus to all students, faculty, and staff.

Students

Students can now eCycle in each resident hall. There are collection bins available in each residence hall where you may drop off the following:

  • toner cartridges
  • ink cartridges
  • and batteries

Faculty and Staff

Faculty and Staff may drop off any toner cartridges or ink cartridges at the Copy Center. There is a collection bin available.

More information about sustainability initiatives on campus could be found on the St. Edward’s University Office of Sustainability.

Also, I.T. Training offers a Green I.T. workshop that covers tips on making environmentally responsible purchases of technology equipment at both the personal level and institutional level.

Help, My Capstone Paper Won’t Open!

How to Recover Corrupted Files in Word

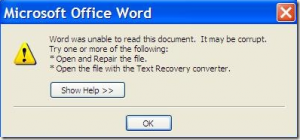
error message for microsoft word: file corruptedIt’s that time of year when end of the semester projects are in full swing and it’s almost time to turn in that big final paper. This gives rise to a common end-of-the-semester situation at the IT HelpDesk – students needing to fix a Word file that will not open, with Word often displaying an error message that the file is “corrupted”.

Why is my file corrupted? What happened?

There are a number of different reasons why your file was damaged. If Word or your computer suddenly crashes, or there’s a power outage while you are working on a document, it might get damaged. Malware might have come into play. It could also be that the part of your drive where the document is saved has become damaged or unreadable, especially if you yank out your flash drive or external hard drive while your document is still open or while it’s trying to save.

Troubleshooting

  1. In Word, first try to recover a previous version of your file.

  2. If you cannot open your file, or any previous version of it, try opening the document on another computer with Word. All campus computer labs have Word installed on every PC and Mac. If the file will not open on any computer or displays an error message, the document is likely damaged.

  3. Before you start trying to recover your file, make a copy of your file and try to fix the copy. The original might get damaged more over time, or you may destroy the file in your efforts to save it.

  4. The Microsoft support site has articles with several methods for recovering your document in Word for Windows or Word for Mac. Try these techniques to see if it’s possible to recover your document. You might lose your document’s formatting styles, but at least you can recover the text.

2 Ways to Attempt Recovery if your Document Will Not Open

The following screencast shows two options for trying to recover a file that will not open in Word 2010. Remember to try these techniques on a copy of your file. The first option is using “Open and Repair,” and the second one to try is “Recover Text from Any File”.  Again, you may lose your formatting or see some extra Word formatting information, but you can always reformat your text once you recover it.

An Ounce of Prevention

Of course, this situation is only dire if you only have one copy of your document. If you keep backup copies of your documents, you can easily work off one of your backups. Consider the 3-2-1 Method of backup: you should have three copies of your files, two of which you can access locally (like on your hard drive and a USB drive) and a third located outside your home or office (like EdShare).