From Written to Digital: Getting Started

Board game with a piece on the start spotOur faculty members reflected on how they began incorporating digital media assignments into their curriculum. Although some of them have been doing this type of assignment for several years, they had some advice to offer those who’d like to dip their toes into the digital assignment water.

Start with a small assignment. With this bit of advice, you can begin by keeping the assignment workload manageable. Don’t start with huge projects like thirty-minute documentaries but instead start with finished assignments that last no longer than 5 minutes.

Schedule in-class time to cover the software. Professor Dede Garrison of Literature, Writing, and Rhetoric says to not be fooled by your students’ technical proficiency. Students may be astute at using familiar technology but when it comes to these assignments, it’s wise to schedule some in-class time to cover the software as per Dr. Don Unger’s suggestion.

Utilize the Digital Media Center. You don’t need to have sole expertise in creating digital content because the Digital Media Center has individuals who can help you and your students.  They can assist with forming the assignment as well as coming into your classroom and teaching your students how to create successful digital media projects.

Learn to use the software yourself. That being said, many of our faculty recommend learning to use the software yourself. You can start by using the software for your own projects as Professor Heath of Journalism and Digital Media did. She stresses that this will help provide a frame of reference for your students on how long these projects should be taking.

Look to your faculty colleagues for templates. You may be surprised to find faculty in your department who are already doing these types of assignments. If you ask, you might find someone who is willing to share what they’ve learned with you.

Now that we’ve discussed a bit of how to get started, let’s examine how we can ensure our students’ success with these projects.


Images from Pexels , which are copyright free. Those selected do not require attribution. No infringement intended.

From Written to Digital: Student Success

bunch of fists bumping in a circleThere’s no reason to reinvent the wheel, our faculty have advice on ensuring your students’ success in these projects.

Emphasize time management is crucial to a successful digital project. In terms of creating a video project, for every minute you’re asking your students to create, that represents an hour of editing–and that’s not even including conducting research, recording footage, script writing, etc. So have a discussion with your students emphasizing that the best projects take time.

Discuss accountability and/or assign roles in group projects. The dreaded group project can be an excellent tool for your digital assignment. Students can become responsible for logistics, script writing, recording, and editing. By discussing how these roles should fill out, the more technically savvy can assign themselves in roles where they can be the most useful and let others stay in more familiar roles.

plan on a white boardHave students create a project plan. Having them figure out what they are recording, who they are interviewing, down to what equipment they will need. Not only will this help them create purposeful projects but it will also reinforce the previous point regarding time management. If your students may feel a need to skip this step, have them present as Dr. Mitchell requires for his Issue Film project.

Record audio right the first time. With the progression of technology, it’s often believed that we can fix everything after we record it. And although this might be true to a certain extent, many of us do not have the time nor the expertise to fix it. Although your students may want the ambient noise of Jo’s Coffee, have them record their interview in a quiet location. The students can then add sounds to the audio/video project when they are editing their videos. As Professor Heath stated, “audio can only be edited so much in the end.” The Digital Media Center offers a whisper room for audio recording.

Raise the stakes by making the viewing audience beyond the faculty member. Dr. Mitchell concludes that by having his students share their projects with each other, the quality of the assignment was higher. It made students want to put forth their very best. As a result, students spent more time on task.

Schedule in-class project editing time. In Dr. Unger’s class, this tactic became especially important as all the videos crafted for Austin Free-Net must have the same look and feel. He could then address any concerns while students were in class. If you’re not feeling particularly savvy, you can have someone from the Digital Media Center on hand to assist your class.

And although this is by no means a comprehensive list of how to ensure student success, you can always drop an email to one of our instructional designers to begin a conversation. Otherwise, let’s move on to how do we actually grade these projects.


Images from Pexels, which are copyright free. Those selected do not require attribution. No infringement intended.

From Written to Digital: Managing Grading

You’re probably thinking that it’s all well and good that we receive support in teaching how to use the technology. But what about the grading aspect? Although you may not feel like an expert or even a budding amateur at this very moment, our faculty members share their experiences to help quell any misgivings you have.

You already know how to grade the content component of a digital media assignment. Is the argument sound? Did the student support their argument with reliable sources? Was a thesis clearly stated? These types of questions should already be familiar to you and will make grading the content a breeze. But what about the technical aspect of the video?

Try learning to use the software with your own projects. Both Professor Heath and Mitchell had the same piece of advice to share. If you recall, this was also a piece of advice in our getting started section. That’s because this can inform so much of what you’re asking your students to produce in their digital media assignments. In grading, it can shed light on what’s possible and not possible.

Ask fellow faculty colleagues for rubrics. Perhaps the most useful piece of advice is that you don’t have to start from scratch. Looking over different rubrics can help you hone in on the areas you want to focus on grading. Here Professors Heath, Mitchell, and Unger have graciously granted us the ability to share their rubrics with you.

  • 1. Introduction/story hook (What is the hook for the story? (25 Points)

    • Does your voice-over contain a hook in the first fifteen seconds?

    2. Script audio/voice-over: (25 Points)

    • Is the interviewee properly identified?
    • Does the voice-over script allow you to build to your main point?
    • Does the voice-over script provide adequate transitions?
    • Does the voice-over script reflect research and knowledge of the subject area?
    • Are you able to leverage operative words —the who, what, when, where, how?
    • Did you upload the script to the blog w/the SoundCloud link?

    3. Audio levels and pacing (25 Points)

    • Are the audio levels consistent?
    • Do you as the interviewer allow space for responses — no talking over your interviewer?

    4. The Edit (25 Points)

    • Does the edited final audio story meet the minimum length requirements?
    • Does it tie the voice-over and interview audio together in a package?
    • Is the audio quality clear? Is the volume level acceptable — not too low or too high?

    Total: /100
  • Credits – 20 points

    • Includes opening credits with title that fits with instructional video series (formatting, naming, etc.)
    • Includes main title image and music
    • Includes closing titles that are formatted correctly and contain accurate information

    Instructions – 40 points

    • Introduction sets up video as part of series and addresses video contents>/li>
    • Body provides step by step instructions without inundating user with extraneous information
    • Conclusion points toward troubleshooting resources and next video in series

    Screencast – 40 points

    • Corresponds to steps in instructions
    • No lengthy pauses or sound flubs
    • Narration is well-paced and clear

    Total: /100 points
  • Content Introduction – 10%

    • Film introduced creatively with examples

    Content – 40%

    • Good variety of interviewees
    • Narration clear and designed to help audience understand issue(s) & perspectives expressed
    • Perspectives expressed creatively illustrated

    Content Conclusion – 15%

    • Narration clearly articulates group perspective and/or summary of points of view expressed

    Form/Editing – 20%

    • Film clearly organized/structured
    • Precise and smooth editing and transitions
    • Editing well-paced and designed to tell a story
    • Sound edits clean and levels balanced throughout film

    Timing – 15%

    • Film length requirement (5-6 minutes) met
    • Film link sent to Instructor prior to class of showing

    Total: /100
  • Your Name: ______________
    Group: __________________

    Rate each member of your group in the following areas related to their group participation. Use a separate sheet for each member of your group. Circle the appropriate number to indicate your rating for each area. Then, total the ratings, divide by 3, and multiply by 10 to get a total score on a 100 point scale.

    Note: This form is between you and your instructor. Your group members will not see this form. They will only receive their average participation score. Using “across-the-board” grades for group members will result in a 50% deduction from your Peer Critique points.

    Group Member's Name: _______
    Total Points: _______________

    Task Functions:

    On a scale of 1-10, rate: how effective was the group member in performing their duties and responsibilities as required?

    Comments:


    Social Maintenance Function:

    On a scale of 1-10, rate: How effective was the group member in contributing to a positive socio-emotional climate? (e.g. showed concern for others’ ideas, openly shared ideas with the group…)

    Comments:


    Group Process:

    On a scale of 1-10, rate: How effective was the group member in contributing to the smooth functioning of the group? (e.g. attendance at meetings, promptness, accepting leadership and/or other functional group roles.)

    Comments:

And that concludes our event writeup, From Written to Digital. Be sure to look out for new events where we discuss digital pedagogy.


Images from Pexels, which are copyright free. Those selected do not require attribution. No infringement intended.

How to Level Up in Canvas: Groups and Discussions

Level Up Your Canvas

You heard from some of our faculty that have leveled up in Canvas in our Faculty Success Stories and now we’ll show you step-by-step how it’s done.

This post will focus on setting up Groups and Discussion board settings.

Creating Groups

Creating Groups in your Canvas course creates a small version course where students can communicate, share and collaborate on course work. Watch the video below for an explanation of what Groups in Canvas are and how they are managed by the instructor.

525 – Groups: Creation & Management from Canvas LMS on Vimeo.

Once you’ve set up your groups in Canvas, they can be also be used to create graded Group Assignments and Group Discussions in a course.

Setting up a Discussion Board

As part of her Faculty Success story, Dr. Varner talked about how she uses discussion boards as a way for students to provide peer feedback by creating a discussion board with threaded replies and the option for ‘liking’. The Canvas Community provides an overview of the different types of discussions that you can use in Canvas, including a Threaded Discussion.

As you create a new discussion, choose both the ‘Allow Threaded Replies’ and ‘Allow Liking‘ options.

If you decide to try either of these student engagement techniques please let us know! If you would like more information about how you can integrate more student engagement into your own Canvas course, please contact Instructional Technology at support@stedwards.edu.


Canvas New Release for 10/28/17

Canvas’ updates for October 28, 2017 include duplication of discussions and a change to the default Home Page.

Discussion Duplication

Discussions can be duplicated in the Discussions page or the Assignments page. The duplication option is located in the Settings menu for every available discussion. When a discussion is copied, the word Copy is added to the end of the discussion name.
Menu for Duplicate located under the Settings icon

All items in the discussion are duplicated including the name, description, and options. The person who copied the discussion is shown as the author of the discussion and is immediately subscribed to the discussion, and the date the discussion was copied displays as the last posted date.

In graded discussions, duplication exceptions include the following situations:

  • Copied peer review discussions retain the peer review setting and Assign Review date, but the number of reviews per user will be set to zero.
  • Copied discussions are always assigned to everyone in the course; differentiated discussions are not retained for individual users, groups, or sections.

Default Home Page is Modules

All new courses for Spring 2018 will open to the default Home Page of Modules.  This is great if you use Modules as the primary means of delivering content in your Canvas course.  If not, you can still change the Home Page of your course to be a Page, the Syllabus, or Assignments.  More information about using Modules may be found in the Canvas Guide to Modules.

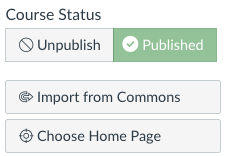
To change your Home Page click on Home from the course menu.  In the right menu, underneath the Publish button, click on Choose Home Page.

Course Status menu, with Unpublish, Publish, Import from Commons and Choose Home Page


For the complete list of updates visit the Canvas Production Release Notes page.

Canvas New Releases 7-15-2017

On JCanvasuly 15, Instructure will release multiple new features for Canvas. Duplication of Assignments and Pages will be a welcome time saver for faculty. For example, if you need to add multiple in-class homework assignments to populate your gradebook in Canvas, this will be a quick way to create those assignments.  New courses added to Canvas after July 15th will default to Modules for the Home Page. In addition, Canvas is changing icons throughout Canvas.

Assignment Duplication

Assignments can be duplicated in the Assignments index page. The duplication option is located in the Settings menu for every available assignment. When an assignment is copied, the word Copy is added to the end of the assignment name.  You can duplicate any assignment by clicking on the gear icon to the right of the assignment name and choosing Duplicate from the drop down menu.

Duplicating an assignment defaults the copied assignment to an unpublished status. All items in the assignment are duplicated including the name, description, point value, and options, except for the following situations:

  • Copied external tool (LTI) assignments, such as Turnitin, will need to be reconfigured.
  • Copied assignments are always assigned to everyone in the course; differentiated assignments are not retained for individual users, groups, or sections.
  • Copied peer review assignments retain the peer review setting and Assign Review date, but the number of reviews per user will be set to zero.

Note: Quizzes and Discussion assignments cannot be duplicated.

Continue reading

Faculty Canvas Focus Group

CanvasOn March 27, 10 faculty representing every school joined the Office of Information Technology’s LMS Success Team for a Canvas Focus Group. Participating faculty answered a series of questions about their use of Canvas and gave us feedback on what they’d be interested in learning more about. The LMS Success Team will use this feedback to develop support articles, create new Canvas trainings and inform new faculty trainings. We’ll also be rolling out a Level Up! campaign next fall to help faculty discover new features and new ways to use Canvas.

We learned that faculty both love (convenience) and hate (grading) the Attendance feature. We’ll offer some tips to deal with grading and Attendance in the Questions section. Quizzes were challenging so we plan on offering some additional training to assist in using quizzes. Now, on to some of the feedback we received.

Favorite Features
Conferences
Data on student access
Uploading documents and images
Integration with Panopto
Combining classes
Speedgrader
Time Savers
Clickable Rubrics
Attendance
Combining multiple sections of the same course
Copying course content from previous courses
Challenges
Differences between Pages, Modules and Files (and when to use each)
Weighting grades
Using Attendance, and its impact on Grades
Setting up rubrics
Combining classes
Quizzes
Like to Learn More About
Quizzes
Using Turnitin in Canvas
Importing course materials, including assignments and calendar events
Best pedagogical practices for learning how to use Canvas features

Several faculty expressed interest in additional training on using the Quizzes feature in Canvas. Instructional Technology will develop a workshop specifically on Quizzes and offer this as a training at the beginning of the fall semester. There is also a guide to Quizzes in the Canvas Community.

Continue reading

SXSWEdu Highlight: Bring Personalized Learning in Your Classes

SXSWEdu Conference


The pedagogy of personalization referenced in this post was presented by Alix Horton (New Tech Network-Literacy Coach), Drew Schrader (New Tech Netwotk-Dir Assessment), and Paul Curtis (New Tech Network-Dir of Platform Dev) in the summit session of SXSWEdu 2017.


What is Personalized Learning?

It entails school culture, pedagogy, available resources and all that might influence the shape of the learning environment. In the 2016 National Educational Technology Plan: Future Ready Learning: Reimagining the Role of Technology in Education (NETP) and the 2017 NETP Update, both define personalized learning as the following:

“Personalized learning refers to instruction in which the pace of learning and the instructional approach are optimized for the needs of each learner. Learning objectives, instructional approaches, and instructional content (and its sequencing) may all vary based on learner needs. In addition, learning activities are made available that are meaningful and relevant to learners, driven by their interests and often self-initiated.”

Personalized learning usually leverages digital tools and applications to customize learning for each individual and ensure students can close the skill gaps, achieve mastery, or gain advanced knowledge in the concepts taught. Personalized learning provides instruction that is meaningful and contextualized for the students, and consists of the following (SXSWEdu 2017):

  • The pace of learning is adjusted and self-paced.
  • Learning objectives, approaches, and content are optimized for each learner.
  • Learning is motivated and driven by learner interests.
  • Learners are given choice in what, how, when, and where they learn.
  • Learning is often supported by technology.

To allow true personalized learning, faculty utilize technology to make it easier to transform courses that support individualized learning. In this post are some strategies in support of personalized learning. Continue reading

Displaying Announcements on the Home Page in Canvas

Canvas-Logo
In a release on 1-7-17, Instructure released a new feature for Canvas that we think you will find useful.

Announcements Can Be Featured on the Course Home Page

If your course has a content page set as the course home page, you can display a certain number of recent announcements at the top of the page. To enable this feature, go to Course Settings, scroll to the bottom and click on More Options. Select the Show Recent Announcements checkbox and specify the number of recent announcements that should be shown (up to 15). By default, the interface displays three announcements unless the number is adjusted. Announcements display in the home page for two weeks.


Click on Update Course Details to save your changes.

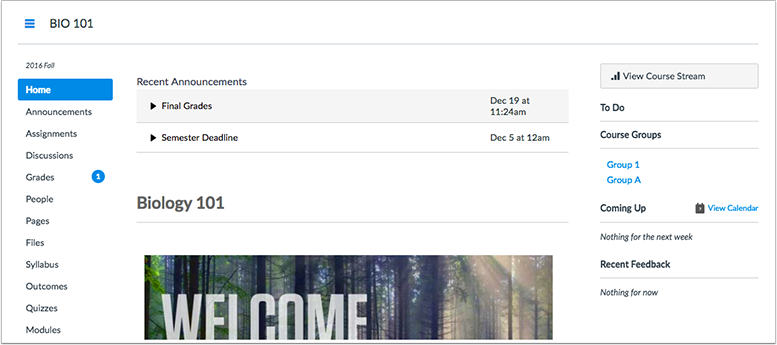
The announcements will show at the very top of the home page, before any course banner images or titles.

Screenshot of course home page showing announcements at top of page

For additional assistance in using Canvas contact Instructional Technology at support@stedwards.edu.

Canvas Start of Semester Checklist

Clipboard with checkmarks and Canvas logoWelcome back!   Here are a few things to check as you set your courses up in Canvas for the semester. The Canvas Community is a great resource if you have questions about using Canvas. You’ll also find answers to many questions on the new Office of Information Technology Support site.


checkbox_no  Make your course available to students

  • Publish your course by clicking on the Publish button in the upper right menu of the Home page
  • Check the Start and End Dates for your classes. By default, students cannot view classes outside of those dates, even if the course is published.  Make sure to set the course end date so that students can use it to study for final and to check their final Canvas grades. Go to the Course Settings to check and change the dates. Click on the Update Course Details button to save the changes.

checkbox_no Rename your course to add the semester and year

checkbox_no Import Content from another Canvas course

  • Go to Course Settings for your Fall 2016 course and click on the button to Import Content into Course
  • Under Content Type select Copy a Canvas Course
  • Search for the course name
  • Choose All Content unless you want to only copy over specific content or want to exclude Announcements created in your prior class.  Note that Announcements from the prior semester are automatically included in an All Content import.  These announcements will be available to students in the current course unless you delete them from Announcements. If you have announcements we recommend choosing “Select Specific Content” and not importing announcements.
  • If you want Canvas to try and adjust your Due Dates on Assignments, also select Adjust Events and Due Dates
  • Click on Import
  • Complete instructions with screenshots are available in the Canvas Community

checkbox_no Check for Broken Links in Your Class

  • If you have imported a lot of material from Blackboard or another Canvas class, it’s a good idea to check for broken links before publishing your course.
  • Go to Settings and click on the last button on the right for Validate Links in Content

checkbox_no Combine multiple sections of a course

  • If you teach more than one section of the same course, you can combine these into one Canvas course. Please be aware of potential FERPA issues if you combine course sections that do not meet together.  You can take some steps to protect students’ privacy by removing People from the menu, and not combining discussions. Instructions for combining courses are available from the Canvas Training Center.

Check box Add your Syllabus

  • Upload your Syllabus and link to it from the Syllabus tool in Canvas
  • You can also copy sections of the Syllabus into the Syllabus Description or a Page in Canvas.

Check box Add Assignments

  • When you add an assignment  it is also automatically added to Assignments, Calendar, Syllabus and Grades
  • Turnitin Assignments are created by selecting the Submission Type External Tool

checkbox_no Add TA’s or additional instructors

  • Go to the People link in the course menu and select +People.  Enter the TA(s) email address, change the role to TA and click on Next. Verify the correct person is being added and click on Add.

checkbox_no Send a message to your students

Check box Meet with Instructional Technology

  • We’re available to help you design your Canvas course, setup your grades, learn how to use new tools such as web conferencing or lecture capture, and to answer questions.  Contact us at instcom@stedwards.edu.