Digital Reading Practices for the Liberal Arts Classroom

IAnnotate screenshot

Reading and Annotating on My iPad with iAnnotate PDF

Today I’m leading a Tech Snack at. St. Edward’s University on “Digital Reading Practices for the Liberal Arts Classroom.”  Tech Snacks bring together faculty members, instructional technology staff, and others at St. Edward’s University to discuss the pedagogical uses of various technologies.  This tech snack will look at ways that reading has changed in the digital age.  My title is borrowed from a NITLE Seminar I organized last year in which  Stéfan Sinclair and Geoffrey Rockwell introduced the NITLE community to computer-assisted text analysis via Voyant Tools.  When I first proposed this topic, I imagined that I would discuss how I had tried an assignment built around this methodology for the intermediate Latin class on Vergil’s Aeneid that I taught last Spring.  I still plan on sharing this example as a way of exploring how computers can offer a different way into the close reading that we typically teach in the literature classroom. That is, computer-assisted text analysis is one of the new methodologies championed by the digital humanities community.  But, I also want to spend some time discussing how we might continue traditional reading practices in a digital environment.  How do we translate our analog, print reading practices into a digital world and what other affordances might that environment offer?

Earlier this year at our tech snack on mobile devices we ended up focusing on the challenges of reading digitally and replicating print reading practices like highlighting and annotation.  One key challenge for students is that there is not a magic bullet in terms of platforms for reading nor even an agreed upon standard to allow for interoperability.  I use a variety of tools depending on medium and type of reading (I also documented my reading practices in this earlier post: How Humanists Read and Why We Need a Better (Electronic) Reading Ecosystem):

  • Diigo (http://www.diigo.com) for highlighting and annotating the web and saving bookmarks in the cloud with added tags, so I can find them later on any device.
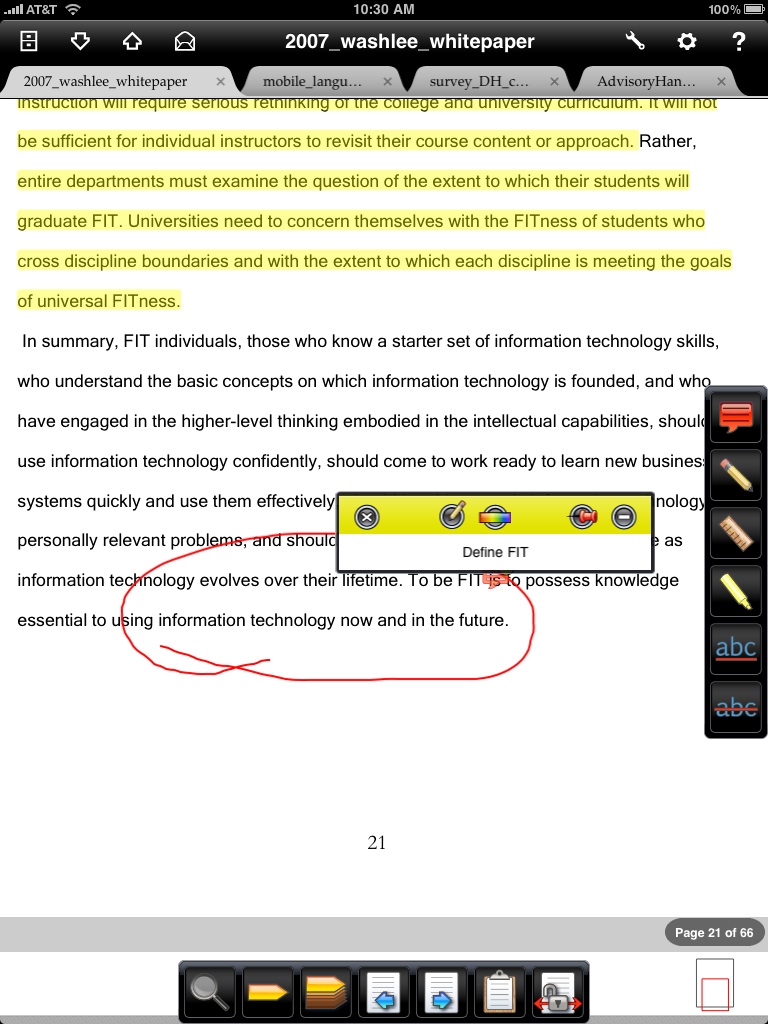
  • iAnnotatePDF (http://www.branchfire.com/iannotate/): For reading, highlighting, and taking notes on my iPad.
  • Kindle for reading on my iPad and iPhone (I don’t usually use highlights).
  • Zotero for tracking bibliography  in the cloud with added tags, so I can find entries later on any device.  I sometimes export notes from iAnnotate and add them to these records.
  • Evernote (http://evernote.com/) for notes from meetings  in the cloud with added tags, so I can find them later on any device.  I can also clip articles (with annotation) from the web, add tags, and same them to notebooks, but I’m not ready to replace diigo with evernote.  I can also forward emails to a notebook with tags.  Since much of my work is done via email and meetings, this platform comes closest to aggregating all I need.
  • Instapaper (http://www.instapaper.com/) for saving online articles to read later, but I have a bad habit of never getting time to read these.

Most of my reading is done individually and requires ways for me to find things (articles, notes, etc.) later when I need it for some project, talk, workshop, etc.  I hope that today’s discussion will get at some of the reading practices we are trying to inculcate in students.  What should our learning goals be for student reading practices?  I’ll share results from today’s tech snack.

Social Annotation

I also hope we spend some time discussing social annotation because 44% of St. Edward’s faculty who responded to this fall’s survey on Academic Innovation reported that they do not use social annotation but would like to. (Of course, this was also one of the technologies that faculty members also reported they were least familiar with.)  The ability to read  and annotate collaboratively in real time is one of the affordances offered by a digital medium.

Here are some tools I know about for social annotation:

Speed Up Your Grading

3 Tips For Making the Blackboard Grade Book Easier to Use

In this Tech Snack on October 18, 2014 we demonstrated several easy steps that can help save you time and frustration while grading.

1. See All Your Students with “Edit Rows Displayed”

Blackboard defaults to showing you the first 10 students in your roster. If you want to see your entire roster of students, click on Edit Rows Displayed and select the number of students you have. This makes it much easier to see all of your students at the same time.

2014-02-06_14-14-54 2014-02-06_14-17-56

2. Minimize Scrolling through Assignments with “Column Organization”

Blackboard also defaults to displaying the most recent grade book entry to the right of the existing entries. The column organization feature allows you to reorder your grade book display as you see fit. For example, you might want to display the most recent entry first. Managing your columns is a great way to minimize the need for scrolling.

2014-02-06_14-25-59            2014-02-06_14-26-49

3. Use Excel to Manage Grades via “Download Roster “

Blackboard allows Instructors to download a current version of their course grade book as an Excel file. Instructors can use this feature to manually enter grades into a spreadsheet and upload it to Blackboard again. Downloading the grade book is also a great way to create attendance charts and sign-in sheets quickly.

2014-02-06_15-01-15          2014-02-06_15-01-56


There are also a variety of video tutorials available on the Instructional Technology website.  Here’s a link to our BlackBoard Grade Book overview.

Build your Classroom Technology Toolbox

On September 24, Instructional Technology held a tech snack focused on free tools for classroom use.

What types of technology do you use in your classroom?

Do you need your students to complete their assignments with certain types of software? You can create your own technology toolbox  from cloud-based tools that are free to use and can benefit students both during the course and after. If you need training for yourself or your students on any of the software that is listed, please contact training@stedwards.edu with your request.

Classroom Management, Collaboration, and Productivity:

Social Bookmarking and Personal Research:

Web Based Presentation Tools

Free E-Books and Other Open Educational Resources

Website Development

Faculty Mobile Device Mixer

On September 20th Instructional Technology welcomed thirteen faculty, Center for Teaching Excellence staff and Library staff to our first Tech Snack for fall — “Mobile Device Mixer”.  We started off by using a mobile app Poll Everywhere to ask faculty to name their favorite app.  Poll Everywhere allows you to conduct a quick poll using any mobile device, including laptops.

Wordle with most popular app displaying as Evernote

Note Taking

No surprise that Evernote tops the list!  Evernote is a great productivity tool.  You can sync notes across multiple devices (Windows, Android, iOS).  You can sort notes into notebooks and tag them for easy searching.  Ann David shared an educational use for Evernote.  She uses Evernote for  Learning Logs for her Educational Technology class. Students make Evernote notebooks and share so she can see live what students are writing.  She can’t edit or make notes on their notebooks but she can give immediate feedback.  Students can include audio, images, and videos to record their experience.

File Management and Sharing

Ryan Hoover discussed the ease of using Google Drive across devices to share documents with students.  DropBox also has an app that lets you access files across devices.

Annotation and Reading

We had a lively discussion on tools to annotate PDFs or ebooks via mobile devices.  Annotation of PDFs and ebooks is still challenging for some students.  Julie Sievers shared her favorite, iAnnotate, which is available for iPads and Android devices.

Other apps we discussed:

  • Quip –  a shared word processor so everyone is editing the same document.  You can add photos to create a collective photo album.
  • TalkBoard – a shared whiteboard, great for creative projects
  • SimpleNote – a note application available on iOS and Androids
  • vBookZ PDF Reader — Reads PDFs to you — great for commuting in Austin!


Faculty Must-Have iPad Apps #1: Evernote

Evernote is a multi-purpose app.  First, it’s a simple tool for taking notes in a meeting or conference presentation.  Second, it’s a way to “clip” web pages, documents and images in much the same way as one would clip interesting articles from paper-based newspapers and magazines.

The above features are not necessarily unique.  However, Evernote is downloadable to each of your devices, from phones to iPads to desktops and laptops and synchronizes across all of them, which IS unique!  Essentially, this functionality allows you to create notes on one device that, when synchronized (automatically once an internet connection is detected), becomes available across all of your devices that have Evernote.  In many instances, this can eliminate the need to email documents and other information to yourself.

Evernote.com

Tech Snacks: iPad Apps and Productivity

Have you ever wondered how the iPad can be used for education and productivity? On Tuesday, February 26, 2013 at 11:00 AM in Premont 110 (Faculty Resource Center) come learn about iPad apps that increase productivity, create to-do lists, calendars, and help you organize class or assignment schedules.

Tech Snacks, sponsored by Instructional Technology, is an ongoing series of short presentations and demos for faculty. Each session will emphasize the pedagogical use of a specific technology or software. Bring your curiosity, questions and an appetite for some snack foods!

Join us on Tuesday, February 26th at 11am in the Faculty Resource Center (FRC) for some snacks and learn more about iPads and productivity apps.

Students, Faculty, and Staff Discounts on Microsoft Office 365 and 2013. What are your options?

St. Edward’s University students, faculty, and staff have the option to use VarsityBuys.com to purchase and download software products for personal use. Some of these products include Office 365 University for students, faculty, and staff, and Office Professional Plus 2013 for faculty and staff.

When it comes to deciding what software best meets your needs, you need to do the research, but we have already done that for you. It is up to you whether you want to subscribe (rent), purchase a license (own), or use an online free version of Microsoft Office. Shown below are the personal use options available for faculty, staff, and students:

Steps to Purchase Office 365 University for Students or Microsoft Office Professional Plus for Faculty and Staff

Visit VarsityBuys.com and select the Institution Type: College/University and then select the Country and State/Province as Texas and click on Go and select Saint Edwards University.  There, you may purchase and download the available software products for Students and Faculty/Staff.

Steps to Create a Microsoft Account and use and Download SkyDrive

First, visit https://signup.live.com to create a Microsoft account, and then visit outlook.com to sign-in using your Microsoft account and view email or select SkyDrive. To download SkyDrive to sync your files visithttp://windows.microsoft.com/en-US/skydrive/download.

Now that you know the various Microsoft Office options to choose from, you just have to decide which type works best for you. For more information and other references visit:

Help, My Capstone Paper Won’t Open!

How to Recover Corrupted Files in Word

error message for microsoft word: file corruptedIt’s that time of year when end of the semester projects are in full swing and it’s almost time to turn in that big final paper. This gives rise to a common end-of-the-semester situation at the IT HelpDesk – students needing to fix a Word file that will not open, with Word often displaying an error message that the file is “corrupted”.

Why is my file corrupted? What happened?

There are a number of different reasons why your file was damaged. If Word or your computer suddenly crashes, or there’s a power outage while you are working on a document, it might get damaged. Malware might have come into play. It could also be that the part of your drive where the document is saved has become damaged or unreadable, especially if you yank out your flash drive or external hard drive while your document is still open or while it’s trying to save.

Troubleshooting

  1. In Word, first try to recover a previous version of your file.

  2. If you cannot open your file, or any previous version of it, try opening the document on another computer with Word. All campus computer labs have Word installed on every PC and Mac. If the file will not open on any computer or displays an error message, the document is likely damaged.

  3. Before you start trying to recover your file, make a copy of your file and try to fix the copy. The original might get damaged more over time, or you may destroy the file in your efforts to save it.

  4. The Microsoft support site has articles with several methods for recovering your document in Word for Windows or Word for Mac. Try these techniques to see if it’s possible to recover your document. You might lose your document’s formatting styles, but at least you can recover the text.

2 Ways to Attempt Recovery if your Document Will Not Open

The following screencast shows two options for trying to recover a file that will not open in Word 2010. Remember to try these techniques on a copy of your file. The first option is using “Open and Repair,” and the second one to try is “Recover Text from Any File”.  Again, you may lose your formatting or see some extra Word formatting information, but you can always reformat your text once you recover it.

An Ounce of Prevention

Of course, this situation is only dire if you only have one copy of your document. If you keep backup copies of your documents, you can easily work off one of your backups. Consider the 3-2-1 Method of backup: you should have three copies of your files, two of which you can access locally (like on your hard drive and a USB drive) and a third located outside your home or office (like EdShare).

Why You Should Have Multiple Web Browsers On Your Computer

The main reason why it is a good idea to have more than one web browser installed on a computer is that it provides a back-up or alternate way to connect to the Internet when a favorite web browser suddenly stops working or denies access to a particular website. Technology is not perfect, as much as we expect it to be. Programs, software, and websites change, get updated and, sometimes, break for unknown reasons.

If you’re still not convinced your browser might be displaying certain webpages differently or not as effectively than another browser, then consider these situations:

1. Versatility

Having multiple web browsers installed on the computer provides you with different interfaces to connect to the Internet. The page loading speed of Google Chrome might be more attractive than using a web browser such as Mozilla Firefox that provides the user with a wide variety of tools and gadgets, or vice-versa.

Try out a variety of web browsers to see what they do and how they display the Internet content on your computer. You may discover that you like one of the newer ones more than your current browser. A list of popular and acceptable web browsers for the Mac, Windows and Linux operating systems is provided at the end of this article.

2. Compatibility and Security

Some websites might not open properly after awhile with the default web browser. Try another web browser to access the website.

3. Reparability/Reliability

Web browsers wear out, become corrupt, out dated and break, just like other computer programs. Upgrading the web browser version or completely re-installing the browser program usually corrects the glitch. But, this isn’t effective when time is not on your side. Using a backup web browser to access information on the Internet will save time and headaches until the problem can be fixed.

Here is a list of some of the more popular and SEU compatible web browsers:

Windows computers:

Mac and Linux computers:

Want to Get Text Messages Whenever Announcements or Grades Are Posted in Blackboard?

Students can sign up via Rave Alerts to receive text or email messages from their Blackboard classes whenever a new announcement, grade or assignment is posted. It’s simple and faculty don’t need to do anything to enable this feature. By default all text and email alerts from Blackboard are turned off so students must opt in.

Rave Alerts are scheduled for delivery every 10 minutes, so if an instructor posts an announcement at 10:30 that class is cancelled for today, students who have signed up for text alerts should receive that message by 10:40.

How to Sign Up?

  1. Log into Blackboard

  2. Click on the Rave link in the Tools menu

  3. You will be automatically logged into Rave.  If you have previously configured your Rave account with a cell phone number you can go ahead and select the classes and alerts you wish to receive.  If you need to add your cell phone number to Rave see the instructions at Signing Up for Topper Text.  If  you have configured your Rave account you can go ahead and select the classes and areas from which to receive texts or emails.

  4. By default all text and email alerts are turned off.    You can choose Default Settings that will automatically be applied to all Blackboard classes. Remember that every announcement, grade, assignment or calendar entry will automatically generate a text message.  You may not want to get that many text messages for every Blackboard class.

  5. You can also choose to only get text or email from specific classes and specific areas.  Click in the boxes in the column under Announcements, Calendar items, Assignments or Grades to enable text messages.