Receiving Copies of Announcements and Messages in Canvas

Are you posting announcements in Canvas and are not sure if your students saw them?  Do you send messages to students through Canvas, but you don’t know if that message was sent out?

Canvas uses Notifications to push copies of Announcements and Messages to faculty and students.  If you want to receive copies of your announcements or messages to your St. Edward’s email you can set a notification to do that.  All messages and announcements are automatically saved as part of the course, but it may be helpful to see when a message is delivered and what the formatting looks like.  Be aware that students can change their notification preferences so they may be receiving text messages on their phone rather than email notifications.

To add a notification for instructor generated announcements or messages

  • Go to Settings in the upper right corner next to your name
    Personal_settings


  • Click on Notifications from the left menu
  • In your list of notifications, set up email notifications by selecting ASAP–by clicking on the checkmark icon, next to the “Announcements Created By You” and “Conversations Created by Me”. These notifications are delayed by one hour in case an instructor makes additional changes, which prevents you and your students from being spammed by multiple notifications in a short amount of time. Note: Each set notification preference will automatically apply to all of your courses. They cannot be set individually.

If you have additional questions about notifications or using Canvas, please contact Instructional Technology at instcom@stedwards.edu.

Grading in Canvas with Multiple Student Submissions

How do instructors grade multiple submissions of assignments in Canvas? How do students view assignments that have been graded with the SpeedGrader or with Turnitin’s GradeMark?

How do students view multiple attempts in Canvas?

In Canvas, students can always submit multiple times to an assignment until the due date (Note: Quizzes only allow one attempt by default). However, students can only view their most recently added submission to an assignment. This means that all previous submissions to the assignment are not available to students, including feedback that instructors have provided through SpeedGrader or Turnitin’s GradeMark.

Tips for grading assignments in Canvas

 In all cases, the last submission by the student is the one that should be graded with either SpeedGrader or Turnitin’s GradeMark.  Only comments added to the last submission in SpeedGrader or GradeMark will appear to the student when they check Grades.  Even if you add SpeedGrader comments and/or GradeMark comments to the first submission, the student will only see the comments on the last submission.
  • When you set up your assignment, in addition to the due date, you should set an ending “Availability Date”.  Set this date to be the absolute last day you will accept papers, even late papers.  This can also be set to be the same as the Due Date. Once the availability date has passed students can no longer submit new attempts.  For example:
    • Paper One is Due October 20th at 11:59 pm
    • The ending Availability Date is set to October 22nd at 11:59 pm
      • Students who submit papers after October 20th at 11:59 pm up until October 22nd at 11:59 pm will have their papers marked as “Late” in Grades.
      • Students will not be able to submit at all after October 22nd at 11:59 pm.
      • You can safely grade papers after October 22nd at 11:59 pm, because students will no longer be able to submit new attempts.
  • We recommend checking for multiple submissions and making sure you are only grading the latest submission. In the SpeedGrader you will see the most current submission listed, but you can also click on the menu to see all of the student’s submissions.
    multiple_submissions2
  • If you are using SpeedGrader or GradeMark, you may want hold off on grading until after the ending availability date so there are no additional submissions. You should set the availability dates so the end availability date/time is before you start grading.
  • If you have paper assignments in which multiple drafts are to be graded or commented on, you can make multiple assignments.  For example, if you have Paper One with 2 drafts and a final paper, you would create 3 assignments–Paper 1-Draft 1, Paper 1 – Draft 2 and Paper 1 – Final.  You can create the Draft assignments as graded assignments worth zero points and it will still create the column in the gradebook. With this method you can comment on the paper using either SpeedGrader or GradeMark and the student will see all of the comments.
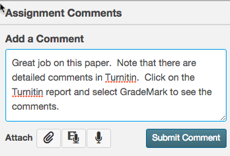
  • Use the Comments field in the SpeedGrader to direct students to view their feedback in Turnitin or to remind them that they need to click on the View Feedback button to review the comments on their work.
    multiple_submissions3

The students sees their graded assignment and feedback by clicking on their assignment under “Recent Feedback” or “Grades”. If they click on Recent Feedback they will see your comments, their grade and the Turnitin icon, if the assignment included a Turnitin report.
multiple_submissions4


If you have additional questions about using Canvas or Turnitin, please contact Instructional Technology at instcom@stedwards.edu.

Communicating with Your Students in Canvas

inbox

Sending email messages to your students

Canvas has a Conversations system that allows you to message students.  Students receive notifications of those messages based on their notification preferences.  By default, everyone’s notification of a new conversation message is via their St. Edward’s email.  To open Conversations, click on the “Inbox” link in the upper right corner, next to your name.

115 – Conversations Overview from Canvas LMS on Vimeo.

Students can choose whether or not they want to receive e-mails notifications of the Message/Conversation sent to them in Canvas.  They could, potentially, choose not to receive any e-mails at all and receive all communications via text message, for example.  Also, users can choose the frequency of those e-mails, text messages, etc. (Right away, Daily, Weekly, Not at all).

  • If your course is not published, students will not receive a notification of an announcement or any other messages from Canvas.
  • Students who have not accepted their course invitations will not receive any notifications from Canvas.
  • Even if the course is published and students have accepted their course invitations, they will only receive notifications according to how they have set their notification preferences in their personal settings.

All Canvas Messages are stored in Canvas so they are part of the course record. Below are links to helpful Canvas resources on using the Conversation system.

Announcements

Instructors can send out announcements to their class via the Announcements tool. Students will be notified according to their notification preferences.

By default students can comment on Announcements, just as they can in a discussion.  Once you have created an Announcement, you can close the Announcement to comments, by clicking on the gear icon to the right of the Edit button.

How to make an announcement: https://community.canvaslms.com/docs/DOC-1807

519 – Announcements Overview from Canvas LMS on Vimeo.

Canvas Tips and Tricks to start off your Semester

Publish your Course

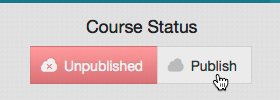
Faculty have you Published your course in Canvas? Now that you have worked on your Canvas course, you need to publish it. The only way Publish students can view your course materials in Canvas is to publish your course. To publish your Canvas course click on your Home button on the top left and then click on Publish under Course status on the top right of your canvas course window. The grey publish cloud will turn to a green Published button and the cloud will have a checkbox.

canvaspublished

Favorite your Courses to View from the Courses Menu

You also have the option to favorite your frequently viewed courses you use over the course of the semester. To favorite your course click on the Courses drop own menu and select “View all and Customize” View all and CustomizeThen you will see a list of all your courses listed. Click on the grey star to turn it yellow and that course will be a favorite. Once the stars next to the courses are selected, you will see those from the Courses drop down menu. Favorite a Course

Rename Your Course to add the Semester

By default all courses in Canvas are named with the convention of Course Code-CourseNumber-Section.  For example, CISC-1301-01.  Canvas associates each class with a Term (Fall 2015) but does not display that term as part of the name.  If you teach the same course several semesters you may find it difficult to distinguish between courses when sending messages to your students or combining class sections.

To append the term to a course

  • Click on “Settings” in your course menu.
  • The first field in Settings is “Course Name.”  We suggest adding the term to your course name, for example, CISC-1301-01-FA2015, to make it easy to distinguish your current course in a list.
  • Click on “Update Course Details” to save.

Have your Students Set up their Personal Notifications

At the start of the semester, we recommend that you remind your students to set their personal notification settings in Canvas. This will allow them to choose what types of notifications they receive from their courses. For example, they could choose to add their cell phone number to be able to be notified via text message. They will just need to go to Settings and then click on “Add a Contact Method” to be able to add their cell phone number. Next, the students may click on Notifications on the left and then set their notifications they want to receive, such as announcements, grades, etc.

To learn more about Canvas visit our Canvas Training Center.

Adding a TA or Instructor to Canvas

Add PeopleCanvas gives instructors the ability to add Teachers, TAs, Designers, Non-Grading TAs, or Supplemental Instructors to their courses.

Roles

  • TAs  and Designers can access, add and edit all content.  They can also grade items and access all items in the gradebook.
  • Non-Grading TAs can access, add and edit all content.
  • Supplemental Instructors can access all content and participate in class conversations and discussions.

How to Add a Teachers, TAs, Designers, Non-Grading TAs, or Supplemental Instructors

  1. Go to your course in Canvas
  2. Click on “People” from the Course Menu
  3. Click on “+People”
  4. Enter the St. Edward’s email address for each person you want to add.  Add one email address per line.
  5. Change the role to Teacher, TA, Designer, Non-Grading TA or Supplemental Instructor
  6. Click on “Next”
  7. You will see a listing that shows the first and last name of the person to be added next to their email address.  Please verify the correct person is being added.  If it is not the correct person, or if the first and last name field is blank, click on “Start Over” and make corrections.  If it is correct, click on “Add Users”.
  8. The TA will receive an email notification inviting them to join the class.

Getting Started with Canvas Q & A Session

Canvas

Stop by Premont 116 between noon and 1 pm on Wednesday, August 26th and we will have Instructional Designers on hand to help you get your course materials up on Canvas and ready for the start of the semester. We will be available to answer questions as well as to provide hands-on help with getting your syllabus, course documents and assignments published in Canvas.

During the session we will also cover:

So stop by Premont 116 with your Canvas related questions and we will get you up and running for the start of the semester.

Student Training for Canvas

CanvasCanvas is new for students as well as faculty.  Based on the survey we did with students in the Spring 2015 Canvas pilots, the majority of students find Canvas easy to learn.  You can make it even easier by adding Canvas Training materials to your Canvas course.

Instructional Technology has curated a module of content, with videos and text, that you can import into your Canvas class.  Topics covered include

  • Setting up Notifications
  • Editing your profile
  • Accessing mobile apps
  • Uploading files to assignments
  • Checking grades
  • Using discussions

To import the Student Training module into your course

  1. In Canvas, click on Commons in the top menu
  2. On the Commons page, click on “Shared with” and select St. Edward’s University
  3. Select the Student Training module and then click on “Import into Class”
  4. Select the class you would like import into.  The import process will begin.

To access the Student Training module in your course

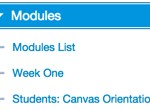
The imported module will be listed in the “Modules” section of your course as ” Students: Canvas Orientation”.  There are two pages in the module.  We recommend linking to this module on the home page of your course.  To link to the Students: Canvas Orientation module from your home page:

  1. Open the Home Page and click on Edit
  2. Click on the location on the Home Page for the link.  In the Right Side Bar menu select “Modules” and then “Students: Canvas Orientation”
    insert_module2

Changing Class Start and End Dates in Canvas

Starts and Ends dates


All courses in Canvas have Start Dates and End Dates.  By default, these dates reflect first day and last day of class as entered in Banner.  If the current date is outside those dates, students will not be able to access the course, even if it is published.  The course will also appear in the course list as either “Future Enrollment”, if the start date has not been reached, or “Past Enrollment”, if the end date has been reached.

To change these settings:

  1. Go to your course in Canvas
  2. Click on “Settings” in the Course Menu
  3. Change the Start Date and time  to be today at the current time.  You can also change the End Date to be later to make sure students can access the course through final exams.  You can also uncheck the box below the dates that states “Users can only participate in the course between these dates.”

If you have questions or need assistance with Canvas, please contact Instructional Technology staff at instcom@stedwards.edu.

Renaming Your Course in Canvas

Course Details tab of SettingsBy default all courses in Canvas are named with the convention of Course Code-CourseNumber-Section.  For example, CISC-1301-01.  Canvas associates each class with a Term (Fall 2015) but does not display that term as part of the name.  If you teach the same course several semesters you may find it difficult to distinguish between courses when sending messages to your students or combining class sections.

To append the term to a course

  • Click on Settings in your course menu
  • The first field in Settings is Course Name.  We suggest adding the term to your course name, for example, CISC-1301-01-FA2015, to make it easy to distinguish your current course in a list.

Do you have questions about Canvas?  Need some help getting your courses set up?  Please contact us at instcom@stedwards.edu.

Using the Syllabus in Canvas

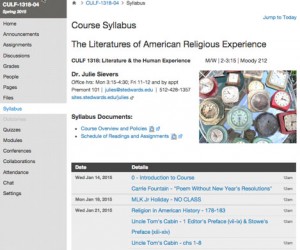
CanvasThe Syllabus in Canvas can be used to post a link to your syllabus or to display the content of your syllabus.  In addition, the syllabus page displays a schedule of assignments, a link to the course calendar and, grades by weight, if you weight your grades. Any course assignment or event will automatically be listed in the bottom half of the Syllabus page with the undated items appearing at the bottom. Changes to these dated events can be made in both the Assignments and Calendar features and will be automatically updated in the Syllabus. The sample syllabus below contains faculty contact information, links to the course overview and policies and a list of assignments and class events.

Sample Course Syllabus

Sample Course Syllabus

The syllabus description is where you can post your course description, a brief introduction, class guidelines, weekly reminders, and other important information. You can copy content from Word documents directly into the Rich Content Editor or create original content inside of the Rich Content Editor. You can also link to your Syllabus by uploading it into Course Files as a PDF and linking it in the content selector. Canvas will automatically create a preview of your document so your students don’t have to download it before reading it.

More information about using the syllabus may be found in the Canvas Guide on the Syllabus or from this video:

https://vimeo.com/78942602

If you have questions about using the Syllabus in Canvas or need additional assistance, please contact Instructional Technology at instcom@stedwards.edu.