Want a great way to reach your students in and out of the classroom? Create your own video content. Creating your own video content can help stimulate interest in subject material and reinforce what is being taught in the classroom. Instructors are able to share videos with future classes, reuse captured video material with other video projects, and make content available so students can have access to videos even after they have completed the course.
Creating video content has never been easier. With smart phones, tablets, and other mobile devices readily available that have the ability to record HD quality videos, you can quickly create and share video content directly to the web. Youtube offers a free browser-based video editor that allows users to edit video clips with several options that are commonly found in video editing software. The Youtube editor has plenty of features that allow users to create videos and has been updated to allow more precise editing. Some of the key features are:
- splitting/trimming video clips
- editing audio
- adding an audio track
- adding titles with backgrounds
- adding annotations
Below is an overview of some of the major features available in the Youtube Editor:
Upload
Once you log in to your Youtube account, click on the “upload” button located next to the search bar. The “upload” page will appear giving you several options to create videos. You can select video files located on your computer, record a video using your webcam, create a photo slideshow, broadcast a Google+ Hangout session or use the video editor. We will be focusing on the video editor features for this article.
Video Editor Interface
The video editor allows users to view the video clips that they have uploaded to Youtube (up to 55 clips) and edit them individually or together on a timeline. The main interface allows users to insert titles, edit clips together, add transitions and an audio track. Users will also be able to publish their edited video from this interface.
Quick Fix
When a video clip is selected, users have the option to apply quick fixes to their video. Users can apply an auto-fix that automatically adjusts color, brightness and contrast. Users can also manually adjust brightness and contrast as well. Another great feature is the ability to stabilize the video clip. This helps remove the “shaky camera” effect when users are recording video without a tripod.
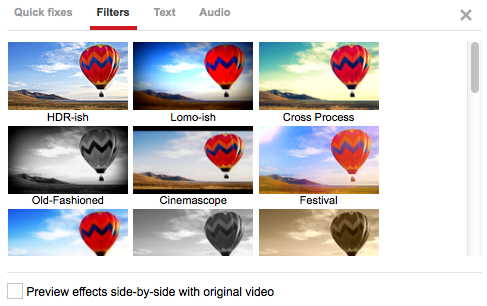
Filters

Users can apply several different filter effects on their video clips to alter the look of their video. These filters adjust color saturation and can give your video a new style or look.
Text

Text can be added over video clips or as title bumpers before a video clip. Users can adjust fonts, position, size, style, color and alignment.
Titles
Titles can be applied before clips and transitions. Users can create titles by simply dragging a title style from the title tool directly to the timeline.
Transitions
Users can also apply transitions between clips, images or titles. These effects will help transition between titles and clips.
Audio Track
Another great new feature is the audio track tool. YouTube now offers a free audio library that has a collection of music tracks that users can download and feature as background music in their videos.
Here is a sample video that was created with an iPad and edited using the Youtube video editor.
Demo: SEU Campus Tour
Here are some other helpful resources on ways to use videos in education. Feel free to contact us here at the Faculty Resource Center if you have any questions regarding video production for your classroom. Good luck.
20 Ways to Use Video in the Classroom
http://www.mediacastblog.com/20-ways-use-video-classroom/
6 Simple Ways To Use Video In Education
http://www.edudemic.com/6-simple-ways-to-use-video-in-education/
Different Types of Videos Used for Education
http://56wrtg1150.wikidot.com/youtube-vodcasts-and-skype
Youtube Video Editor Support
https://support.google.com/youtube/answer/183851?hl=en-GB
Free music for your videos in Audio Library
https://support.google.com/youtube/answer/3376882?hl=en-GB&ref_topic=3014750
