| Here are 4 quick tips for making the Canvas Gradebook more convenient and easier to use: | |
| 1. Mute Assignment:
Muting an assignment allows you to work on grade entry without the students being able to see the grades. Un-mute the assignment when you have finished grading so that students can view their grades and feedback. |
|
| 2. Grade Totals next to Student Names:
When there are multiple grade book columns, it might be preferable to have the total column on the left side next to the student names. This makes it much easier to see the student’s grades. |
|
| 3. Organizing Columns and Rows:
Arranging Columns by due date allows you to sequence the columns in chronological order. You can click the column heading to sort the rows. For example, clicking the total column header will sort the students by total grade. |
|
| 4. Dash vs. Zero
Don’t forget that the dash indicates no submission, while the zero indicates that you’ve given the student a zero. The dash won’t count toward their grade, the zero does. Some instructors are unaware that dashes don’t count against students. |
|
Tag Archives: grading
New Teacher App for Canvas
Canvas has released the Canvas Teacher app, available for iOS and Android phones and tablets. Canvas Teacher allows instructors to manage their courses from a mobile device. Canvas Teacher replaces the existing Android and iOS SpeedGrader apps. Download the free app from the iOS App store or Android Play store.
This app provides quick access to grading submissions, communicating with students, and updating course content through Announcements, Assignments, Discussions, and Quizzes.
Grade Submissions
Instructors can browse submissions and provide feedback to their students with a new and improved mobile SpeedGrader embedded in the app.
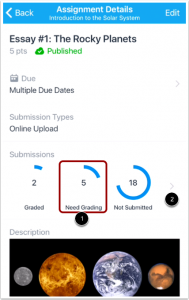
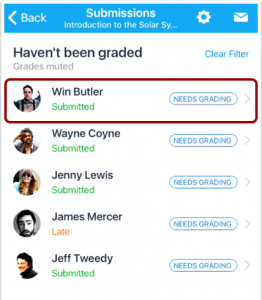
To grade a submission, open your class and select Assignments. Select the Assignment you wish to grade. Select the Needs Grading (1) icon to see the list of submissions. Select Needs Grading to the right of the student submission you wish to grade.
The speedgrader includes the same markup and commenting tools of the web-based speedgrader.
Grading and Providing Feedback in Canvas
The Canvas gradebook has many features that are useful for providing feedback on various types of assessments and assignments.
In the following video, we will review how to grade assignments, provide feedback (comments) as well as how to provide annotated feedback (mark-up and comments) using the SpeedGrader.

Whenever you create a new graded assignment, you will get a corresponding column in your gradebook[1]. Use the cells [2] in the grade book to input grades for your assignments. All assignments must be entered as points but you can change how the students see the grade in their gradebook (e.g. percentage, letter grade, etc.) or you can ‘Mute‘ the column so students won’t see the grade at all (you can always ‘unmute’ or reveal the grades to students later.)
You can provide feedback and comments on an assignment by clicking on the comment icon [3] in the corner of a gradebook cell. Comments are great for short notes and questions. Students can respond to your comments, and the conversation can continue for the duration of the course. The comment will appear on the Dashboard, on their “Grades” pages, and in the comment stream of the SpeedGrader display for the assignment.
Canvas has a tool called SpeedGrader which lets you quickly preview, comment and/or annotate a student’s assignment submission. Using the SpeedGrader and the Crocodoc toolbar, you can mark-up and add comments. NOTE: If you use the SpeedGrader, make sure you tell your students to click on the ‘View Feedback’ link when they view their submission grade in order to see ALL annotations and comments made on their assignment.
If the assignment being graded is a TurnItIn assignment, you can access the TurnItIn Originality score and report by clicking on the TurnItIn score icon [4] in the gradebook. Once you view the TurnItIn Originality report, you can use the TurnItIn Grademark tools to provide annotated comments and feedback.
Tips for Using Blackboard Grade Center
To make your grading process more efficient in Blackboard follow these tips:
A) Hide unnecessary columns from your view
B) Organize your grade center columns in a way that makes sense for you and your students
C) Use categories to create a group of assignments, eliminate lower grades from a group of assignments, or to calculate the final grade based on percentages (weights)
For more information on using the Gradecenter visit Instructional Technology’s Guide to Blackboard’s Grade Center.
Please remember that final grades must be submitted using My Hilltop. See the instructions in this video on Submitting Grades in myHilltop.
Contact the Faculty Resource Center (instcom@stedwards.edu or 464-8804) to schedule a Grade Center consultation or if you have any questions.
Instructional Technology wishes you a happy grading season!
Speed Up Your Grading
3 Tips For Making the Blackboard Grade Book Easier to Use
In this Tech Snack on October 18, 2014 we demonstrated several easy steps that can help save you time and frustration while grading.
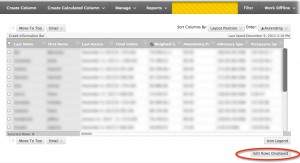
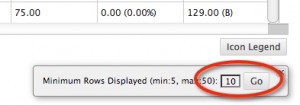
1. See All Your Students with “Edit Rows Displayed”
Blackboard defaults to showing you the first 10 students in your roster. If you want to see your entire roster of students, click on Edit Rows Displayed and select the number of students you have. This makes it much easier to see all of your students at the same time.
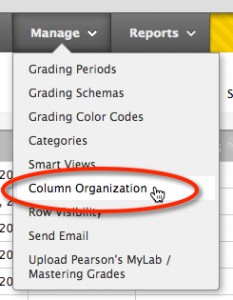
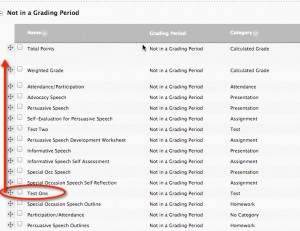
2. Minimize Scrolling through Assignments with “Column Organization”
Blackboard also defaults to displaying the most recent grade book entry to the right of the existing entries. The column organization feature allows you to reorder your grade book display as you see fit. For example, you might want to display the most recent entry first. Managing your columns is a great way to minimize the need for scrolling.
3. Use Excel to Manage Grades via “Download Roster “
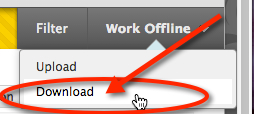
Blackboard allows Instructors to download a current version of their course grade book as an Excel file. Instructors can use this feature to manually enter grades into a spreadsheet and upload it to Blackboard again. Downloading the grade book is also a great way to create attendance charts and sign-in sheets quickly.

There are also a variety of video tutorials available on the Instructional Technology website. Here’s a link to our BlackBoard Grade Book overview.
Blackboard Tips
Blackboard Tips: Grade Center
A Calculated Column gathers data from multiple Grade Center columns and performs a calculation such as an average grade for a set of assignments. New courses and restored courses contain two Calculated columns by default: a Total Points column and a Weighted Grade column. To create a new calculated column, select a type such as “average column” from the “Create Calculated Column” list. On the following page enter a column name and set other options, such as whether to display the column to students. Click submit when you are finished.
Blackboard Tips: Make Your Course Available
To make a course available in Blackboard, go into your course’s homepage on Blackboard. On the Control Panel on the left side of the screen, click ‘Customization,’ and then under ‘Customization,’ select ‘Properties.’ This will take you to the Properties window. Under ‘Set Availability’ check ‘Yes’ to make the course available, then click ‘Submit’ at the bottom of the page.
Blackboard Tips: Edit Mode in Blackboard
When you are in Blackboard, if you find that you cannot edit your content, look at the edit mode button in the top right corner of the page. If the edit button is switched to the off position then click it and it will switch on. You should now be able to edit your content. The purpose of having the edit mode button is to allow you to see your Blackboard course from a student perspective. It can be useful to check your edits with the edit mode off when you are done.
Blackboard Tips: How to ensure that your students can reply to your Blackboard announcement e-mails
When you create an announcement in Blackboard, you will be presented with the option “E-mail Announcement” to send the announcement to your students via email. If you want your students to be able to respond to you directly, be sure that you check the “Send a copy of this announcement immediately” box. Otherwise, Blackboard will send the email from a generic IT address and any responses from your students will be directed to IT rather than back to you. To ensure that the email is sent from your address, make sure to check the box to the right of “E-mail Announcement.”
Blackboard Tips: Creating a Turnitin Assignment
The process for creating an assignment in Turnitin is different than creating a normal assignment. To do this go to your blackboard homepage click the “Assignments” link in the course menu. Mouse over “create assessment” and select “Turnitin Assignment” form the drop down menu. Select the type of assignment you wish to create from the three options presented. Enter an assignment title, a point value, and the start, due and post dates. Once you are finished click “submit”. Your Turnitin assignment will appear under Assignments.
Blackboard Tips: Course Reports
Faculty can use the Course Reports area to generate reports on course usage and activity. Faculty can view a specific student’s usage to determine if students are actively using course materials. The report appears in the form of graphical charts. Course reports provide different ways to view information about student activity and content usage. To run a new report, select a course you are teaching and open the course Control Panel, click on Evaluation and then Course Reports. Choose your desired options and run the report.
Blackboard Tips: Clearing Attempts in Turnitin
If you need to clear a student’s attempt in Turnitin, go to the Full Grade Center and find the cell that corresponds to the student’s attempt that you would like to clear. Then click the double arrow box to the right of the cell and select the third option “Attempt” from the menu. In the Modify Grade window, select the “Clear attempt” button. Click submit to save changes.
Blackboard Tips: Course Reports
Faculty can use the Course Reports area to generate reports on course usage and activity. Faculty can view a specific student’s usage to determine if students are actively using course materials. The report appears in the form of graphical charts. Course reports provide different ways to view information about student activity and content usage. To run a new report, select a course you are teaching and open the course Control Panel, click on Evaluation and then Course Reports. Choose your desired options and run the report.
Blackboard Tips: Reordering Items in a Content Area or Menu Bar
In order to move items in a content area, mouse over the top right corner of the item box (or the double pronged arrow to the right of the box in the case of the menu bar items) until the cursor changes into the four pronged arrow. Now simply click and drag the item to where you want it to be.
Blackboard Tips: Downloading Assignments from Grade Center
To download assignment files that students have submitted, go to Grade Center and click on the double arrow to the right of the assignment that you would like to download. Select “Assignment File Download” from the drop-down list. On the next page you can choose to download all files or just the files from selected students. Click “submit” once you have selected which files to download, and then click the “Download Assignments Now” link. Save the .zip file to your drive and open it to view the files.
Blackboard Tips: Copying Files from One Course to Another
If there is a file that already exists in one course that you wish to make available in another course you must first locate the file and click the double down arrow on the right side of the file’s name. From the drop down menu, select the “Copy” option. Then select the course and folder in which you wish the file to appear. Finally, click “Submit.” Your file should now be available in both courses. To move a file from one course to another, simply follow the same procedure as above but instead of selecting the “Copy” option from the drop-down menu, you will select the “Move” option.

