Collaborative Student Assignments Outside the Classroom

On Wednesday, February 12 at noon Instructional Technology hosted a tech snack on collaborative student assignments outside the classroom featuring Kendall Kelly, Assistant Professor of English, Writing, and Rhetoric. Dr. Kelly led a discussion that focused on these questions:

  • How can we get students to interact and collaborate outside of class meetings?
  • What kinds of online assignments engage students and enhance in-class learning?

Blog imageDr. Kelly began by describing how she gets her students to collaborate online using blogs, wikis, and group spaces in Blackboard and shared a handout, “Tips for Using Blogs to Improve Student Outcomes.” These tips underline the importance of structuring the use of blogging assignments so that there are clear expectations for students and that they are rewarded for their effort.  Blackboard allows Dr. Kelly to give private feedback and easily track student blogs and responses, so that this assignment does not impose an inordinate amount of work on the instructor. She says she is able to read 20 student blogs in about 30 minutes before class starts. Dr. Kelly motivates students by noting good blogs in front of the class.

Dr. Kelly uses this blogging assignment to help students read challenging theoretical texts for her freshman level course on technical communication. Her writing prompts guide their reading, and, by reviewing the blogs before class, she can see what students are thinking and where they aren’t understanding the text. These insights in turn lead to a richer in-class discussion.

Blogs offer an alternative to discussion boards, which are a common and long-established mainstay of online learning.  In contrast to the discussion board, blogs seem to inspire greater investment from students. They are more like mini-papers than the conversational interchange of the discussion board, and by being identified with one particular student, blogs allow for more development of a student’s voice.  The focus is on the student rather than the topic, as it might be in a discussion board.  In Dr. Kelly’s class, students compete to be recognized for their unique perspective in class.  For example, a recent class has been vying to see who can come up with the best food analogy to explain the reading.

By using the Blackboard tool for blogs rather than a public blog, Dr. Kelly offers a safe space for student discussion while still applying the pressure of a public class audience.  When asked about whether students resisted sharing their works with others, Dr. Kelly pointed out that collaborating with other students is a listed course objective on the syllabus, so students begin the course with this clear expectation. Overall, blogs allow Dr. Kelly’s students to improve their reading and writing outside of class in such a way that it raises the level of in class interaction.  This instructional design is a good example of effectively linking in- and out-of-class work in a hybrid or blended learning format.
Tips for Using Blogs to Improve Student Outcomes

Blog imageKendall Kelly, Assistant Professor of English, Writing, and Rhetoric, is our guest blogger for this post:

Student blogging can create valuable learning opportunities.  Blogs can provide students the chance to work on particular skills like writing, audience analysis, or critical thinking, or engage a text or project in an asynchronous, low-stakes manner.  They give students a medium to engage classmates and allow the instructor to informally evaluate student comprehension before class begins.  However, to facilitate student learning, instructors need to use blogs properly.  Below I’ve listed some tips to maximize student learning.

  1. Write a prompt for each blog.
  2. Set a due date that gives students time to respond to one another’s blogs.
  3. Require students to respond to one another’s blogs.
  4. Set quality and quantity guidelines i.e. two paragraphs that analyze the salient point with evidence from the text.
  5. Grade every blog, every time. (I usually assign a point value to each blog and student response and just add them up as I go.  And I give extra credit to good blogs. )
  6. Integrate the information from the blogs into your lectures.  (Give a student a shout out for a good blog or even invite him or her to start class discussion.)
  7. Blogs are iterative and essentially collaborative (i.e. everyone’s reading everyone else’s blog), so one or two good bloggers can raise the bar for the class, and one or two bad bloggers can drag the class down.
  8. Use Blackboard for student blogs if possible.
    1. Blackboard allows you to give student grades.  They see their grade go up with each blog which encourages them to write the next blog.
    2. You also have the opportunity to give students private feedback on Blackboard, so if their blogs aren’t quite up to snuff, you can let them know.  Blogs are an iterative process, so if they don’t initially do well, they have the opportunity to improve.
    3. Blackboard will count blogs and comments for you.
    4. Blackboard will keep track of the grade and just put it in the grade sheet, if you set it up properly.
    5. And the blogs will only be available to the class which creates a safe place to write and keeps crazy outsiders from making inappropriate comments or using student information for nefarious purposes.
    6. Blackboard won’t allow students to post video (or at least it hasn’t in the past) or audio files so it may not work for every situation.  SEUfolios will allow multi-modal media and let students manipulate the format, so it might work for those assignments.

Note: WordPress Blogs are also available to St. Edward’s University, faculty, students, and staff through http://sites.stedwards.edu/blogs/ These sites can be set up as individual blogs or a group of blogs can be set up for a class. Contact Instructional Technology for more information.

References: Image available from Wikimedia Commons, http://commons.wikimedia.org/wiki/File:Blog_(1).jpg

Speed Up Your Grading

3 Tips For Making the Blackboard Grade Book Easier to Use

In this Tech Snack on October 18, 2014 we demonstrated several easy steps that can help save you time and frustration while grading.

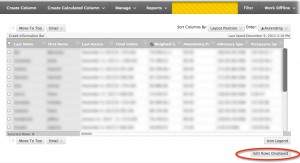
1. See All Your Students with “Edit Rows Displayed”

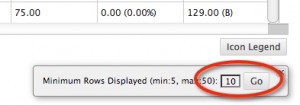
Blackboard defaults to showing you the first 10 students in your roster. If you want to see your entire roster of students, click on Edit Rows Displayed and select the number of students you have. This makes it much easier to see all of your students at the same time.

2014-02-06_14-14-54 2014-02-06_14-17-56

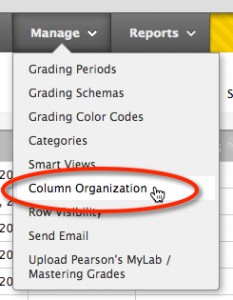
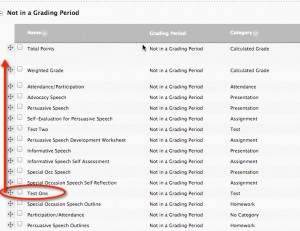
2. Minimize Scrolling through Assignments with “Column Organization”

Blackboard also defaults to displaying the most recent grade book entry to the right of the existing entries. The column organization feature allows you to reorder your grade book display as you see fit. For example, you might want to display the most recent entry first. Managing your columns is a great way to minimize the need for scrolling.

2014-02-06_14-25-59            2014-02-06_14-26-49

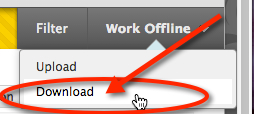
3. Use Excel to Manage Grades via “Download Roster “

Blackboard allows Instructors to download a current version of their course grade book as an Excel file. Instructors can use this feature to manually enter grades into a spreadsheet and upload it to Blackboard again. Downloading the grade book is also a great way to create attendance charts and sign-in sheets quickly.

2014-02-06_15-01-15          2014-02-06_15-01-56


There are also a variety of video tutorials available on the Instructional Technology website.  Here’s a link to our BlackBoard Grade Book overview.

Want to Get Text Messages Whenever Announcements or Grades Are Posted in Blackboard?

Students can sign up via Rave Alerts to receive text or email messages from their Blackboard classes whenever a new announcement, grade or assignment is posted. It’s simple and faculty don’t need to do anything to enable this feature. By default all text and email alerts from Blackboard are turned off so students must opt in.

Rave Alerts are scheduled for delivery every 10 minutes, so if an instructor posts an announcement at 10:30 that class is cancelled for today, students who have signed up for text alerts should receive that message by 10:40.

How to Sign Up?

  1. Log into Blackboard

  2. Click on the Rave link in the Tools menu

  3. You will be automatically logged into Rave.  If you have previously configured your Rave account with a cell phone number you can go ahead and select the classes and alerts you wish to receive.  If you need to add your cell phone number to Rave see the instructions at Signing Up for Topper Text.  If  you have configured your Rave account you can go ahead and select the classes and areas from which to receive texts or emails.

  4. By default all text and email alerts are turned off.    You can choose Default Settings that will automatically be applied to all Blackboard classes. Remember that every announcement, grade, assignment or calendar entry will automatically generate a text message.  You may not want to get that many text messages for every Blackboard class.

  5. You can also choose to only get text or email from specific classes and specific areas.  Click in the boxes in the column under Announcements, Calendar items, Assignments or Grades to enable text messages.

Course Availability in Blackboard

As a new semester begins I wanted to remind students and faculty about the availability of Blackboard classes.  All classes from the official course catalog  are automatically loaded into Blackboard with a status of unavailable. Those courses are immediately available to faculty; however, students will not see those courses in Blackboard until faculty make their courses available.

Steps for faculty to use to make a course available to students:

  1. Go to the Control Panel for the Class
  2. Click on Customization
  3. Click on Properties
  4. Select Yes in the Set Availability section
  5. Click on Submit

You will receive an onscreen receipt confirmation. Now your course is accessible to your students.

Note that classes in Blackboard will automatically be made unavailable to students on the 12th class day of the next semester.

Blackboard Tips

Blackboard Tips: Grade Center

A Calculated Column gathers data from multiple Grade Center columns and performs a calculation such as an average grade for a set of assignments. New courses and restored courses contain two Calculated columns by default: a Total Points column and a Weighted Grade column. To create a new calculated column, select a type such as “average column” from the “Create Calculated Column” list. On the following page enter a column name and set other options, such as whether to display the column to students. Click submit when you are finished.

Blackboard Tips: Make Your Course Available

To make a course available in Blackboard, go into your course’s homepage on Blackboard. On the Control Panel on the left side of the screen, click ‘Customization,’ and then under ‘Customization,’ select ‘Properties.’ This will take you to the Properties window. Under ‘Set Availability’ check ‘Yes’ to make the course available, then click ‘Submit’ at the bottom of the page.

Blackboard Tips: Edit Mode in Blackboard

When you are in Blackboard, if you find that you cannot edit your content, look at the edit mode button in the top right corner of the page. If the edit button is switched to the off position then click it and it will switch on. You should now be able to edit your content. The purpose of having the edit mode button is to allow you to see your Blackboard course from a student perspective. It can be useful to check your edits with the edit mode off when you are done.

Blackboard Tips: How to ensure that your students can reply to your Blackboard announcement e-mails

When you create an announcement in Blackboard, you will be presented with the option “E-mail Announcement” to send the announcement to your students via email. If you want your students to be able to respond to you directly, be sure that you check the “Send a copy of this announcement immediately” box. Otherwise, Blackboard will send the email from a generic IT address and any responses from your students will be directed to IT rather than back to you. To ensure that the email is sent from your address, make sure to check the box to the right of “E-mail Announcement.”

Blackboard Tips: Creating a Turnitin Assignment

The process for creating an assignment in Turnitin is different than creating a normal assignment. To do this go to your blackboard homepage click the “Assignments” link in the course menu. Mouse over “create assessment” and select “Turnitin Assignment” form the drop down menu. Select the type of assignment you wish to create from the three options presented. Enter an assignment title, a point value, and the start, due and post dates. Once you are finished click “submit”. Your Turnitin assignment will appear under Assignments.

Blackboard Tips: Course Reports

Faculty can use the Course Reports area to generate reports on course usage and activity. Faculty can view a specific student’s usage to determine if students are actively using course materials. The report appears in the form of graphical charts. Course reports provide different ways to view information about student activity and content usage. To run a new report, select a course you are teaching and open the course Control Panel, click on Evaluation and then Course Reports. Choose your desired options and run the report.

Blackboard Tips: Clearing Attempts in Turnitin

If you need to clear a student’s attempt in Turnitin, go to the Full Grade Center and find the cell that corresponds to the student’s attempt that you would like to clear. Then click the double arrow box to the right of the cell and select the third option “Attempt” from the menu. In the Modify Grade window, select the “Clear attempt” button. Click submit to save changes.

Blackboard Tips: Course Reports

Faculty can use the Course Reports area to generate reports on course usage and activity. Faculty can view a specific student’s usage to determine if students are actively using course materials. The report appears in the form of graphical charts. Course reports provide different ways to view information about student activity and content usage. To run a new report, select a course you are teaching and open the course Control Panel, click on Evaluation and then Course Reports. Choose your desired options and run the report.

Blackboard Tips: Reordering Items in a Content Area or Menu Bar

In order to move items in a content area, mouse over the top right corner of the item box (or the double pronged arrow to the right of the box in the case of the menu bar items) until the cursor changes into the four pronged arrow. Now simply click and drag the item to where you want it to be.

Blackboard Tips: Downloading Assignments from Grade Center

To download assignment files that students have submitted, go to Grade Center and click on the double arrow to the right of the assignment that you would like to download. Select “Assignment File Download” from the drop-down list. On the next page you can choose to download all files or just the files from selected students. Click “submit” once you have selected which files to download, and then click the “Download Assignments Now” link. Save the .zip file to your drive and open it to view the files.

Blackboard Tips: Copying Files from One Course to Another

If there is a file that already exists in one course that you wish to make available in another course you must first locate the file and click the double down arrow on the right side of the file’s name. From the drop down menu, select the “Copy” option. Then select the course and folder in which you wish the file to appear. Finally, click “Submit.” Your file should now be available in both courses. To move a file from one course to another, simply follow the same procedure as above but instead of selecting the “Copy” option from the drop-down menu, you will select the “Move” option.