Establishing your woodshop
OK – so maybe this is a little misleading. Each space a person has to work in is unique. Many share similarities, but for the most part they are unique. Understanding what kind of projects you want to do and the space available is a big consideration when determining how your shop needs to be set up.
That being said, you have decided to start woodworking, you understand the benefits and the commitment, and you have a good basic idea of the tools you will need to begin. Now you need to set up your shop.
As the person using the space, YOU need to decide what will work best for you based on how you like to work. The question is, what does that look like? Fortunately, I have assembled some suggestions that will point you in the right direction that should help you get up and running pretty quickly.
Important Things to Consider
Before you begin, you need to know how much space you have to work with. Knowing this ahead of time will help in setting your shop up, and help you answer the following:
-
- Will your shop layout allow for your larger tools to be stationary (think table saw/band saw/router table, etc.), or will they need to be mobile/mounted for easy storage and portability?
-
- How much storage you will need, and what type can your space support? Cabinets? Shelving? Both? There is benefit to having your tools out in the open. It is much easier to engage them when need and saves time. However, if your desire is storage and out of sight, Saws on Skates has a set of free plans to assist in creating some pretty easy cabinets.
-
- Power – will you need 110 and/or 220? Do you have any 20-amp outlets to support some of your larger power tools? Are there outlets available?
-
- Consider your workflow process – basically how you create and build. Organization of your primary tools around how you work should be a big consideration. If you haven’t thought about this yet, that’s o.k. As your skills grow, where you decide to keep primary tools in your shop with change as well.
-
- Determine the size of your workbench based on space, then build or buy (I propose build – great first experience for tools and engages in the fundamentals of box building – Woodworking for Mere Mortals has great information on understanding why and how to build a basic box).
How much space to do have to work with for my workbench? There are lots of bench plans available for free on the web. This one from build something.com has free plans and has casters for portability.
-
- Lighting – Make sure you install bright lightning. Kasia at woodenpalletprojects.com recommends that the best choice for lighting would be LED light fixtures, not some fluorescent, old-style flickering lights. LED lights are much brighter and will save you dollars on energy bills. I’d recommend going for a warmer (more yellow) color temperature.
-
- Clean up and dust collection. Maintaining a clean and clutter free workspace is not only important, it’s SAFE. For smaller shops, in conjunction with your personal use of a dust mask or respirator, have you considered using a box fan with an air filter to remove particulate matter from the air? How about using a shop vac to remove heavier debris from your tools and shop floor?
Example Garage Woodshop Layout
The image below comes from garagewoodwork.com. The floor plan is a good example of the best use of space and organization in a small area:
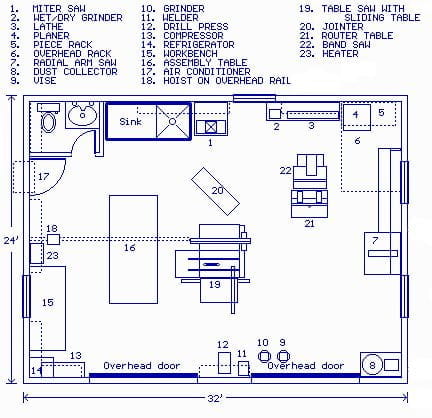
Notice that the shop floor, even for such a small area, is kept relatively clear. Take note of how the tools are set up in stations.
The image above presents a good idea of how a shop can, and if possible, should be organized.
Speaking of Organization…
Here are a few tips to keep in mind when laying out how your space will work:
-
-
- Tools that are used the most should be nearby. Items that would be used for assembly or on the work bench should be located at or close to those areas. This will safe you time.
-
-
-
- Clamps – should be easily accessible and nearby your assembly and/or workbench for ease of use.
-
-
-
- Tape – its best to store these in a dispenser type of holder, making them ready for use when you need them. This is a great idea for a dispenser from Popular Woodworking Magazine.
-
-
-
- Create a storage / charging station for drills, drivers, other battery powered devices like in the image below:
-

-
-
- Fasteners – create storage bins for containing various fasteners used for projects. Have this be a part of your assembly table for easy access.
-
-
-
- Wood storage – Material that your going to use – store close to the entrance of your space, making it easy to unload and store. For scrap, well, this can easily overrun your workshop if you’re not careful. Every woodworker sees potential in every piece of leftover material. My suggestion is to set some boundaries and move on. I tend to get rid of everything with defects and is potentially too small to cut safely. This is challenge is unique to each person. I get it. Just watch out – you can easily be swimming in leftover wood before you know it.
-
-
-
- If you opted for a miter saw, and its going to be stationary, keep it near your lumber stock. Lots of woodworkers use the miter saw to cut down longer pieces of wood in addition to making angled cuts.
-
-
-
- Notice in the image of the woodshop above that the table saw and the assembly table are centrally located in the space. If you have the room in your shop – you should do the same.
-
You’re going to be spending a lot of time in this space. Set it up well, and reorganize it as your needs and skills change.
There are many other suggestions that can be made around shop organization and set up. I believe that I hit on the big ones. As I said before, how your set up your shop is unique to you, your working style, and the amount of space you have available. Do some research and find things that look like they will work with the space you have. Your shop will grow as you grow.
I hope this post helped point you in the right direction regarding some of the fundamentals of getting your woodworking space in order! If there are things I didn’t cover, or additional items that you feel need or should be addressed, please feel free and leave a comment below and I’ll be sure to get back with you. In the mean time, I have included some additional shop layouts available on Pinterest.
If you found this post or any of the other post interesting, engaging or helpful, click the subscribe button and get notified when new posts come out!
References:
https://www.pinterest.com/pin/392024342534500798/
https://www.buildsomething.com/plans/PE2FB00363ABE263F/EasyBuildWorkbench
https://woodenpalletprojects.com/
http://www.garagewoodwork.com/garage-layout.php
https://powertoolsonsale.com
http://www.garagewoodwork.com/garage-layout.php
https://woodworkingformeremortals.com/how-to-make-a-basic-box-and-why-you-need-to-know-how/