Beginner’s Guide to using a table Saw

How To Use Your Table Saw

As I have mentioned before in a previous post about the top tools that a beginner woodworker should start with, The table saw is probably the cornerstone of your tool collection.

The table saw, at its essence,  is a circular saw that has been mounted under a table surface, with a part of the blade protruding above the table, where it is exposed and able to cut wood.

Although very simple in nature, a table saw offers countless uses for woodworking, and also provides a large amount of convenience and consistency. It is the exact opposite of freehand cutting in every way.

When used in the proper way, a table saw can be counted on to ensure exacting accuracy on a number of different cuts, no matter how many work pieces you have lined up that need cutting.  When milling and assembling projects, accuracy is key.

Anatomy of a Basic Table Saw

https://sawsreviewed.com/wp-content/uploads/2018/09/Table-Saw-Parts.jpg


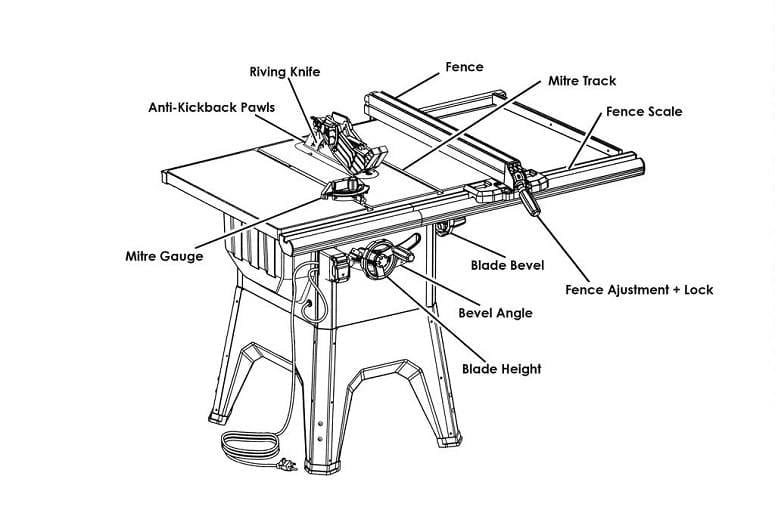
Table – This is where the table saw gets its name.  Most of the operational features of the saw are located here.

Saw – This is a circular saw mounted on an arbor that gives it the proper angle and placement while keeping the saw completely firm and steady.

Blade plate – The blade plate is the area around the slot where the saw blade rises up and above the table.

Blade cover – The cover protects both the blade and the user when cuts are being made. It fits over the saw blade and is curved to match the saw blade’s shape.

Anti kickback – THIS IS A LARGE SAFETY CONCERN FOR THOSE USING TABLE SAWS.  When a piece of wood is not secured properly, or fed incorrectly into the saw blade, the forward motion of the saw blade can catch the work piece and hurl it outward – sometimes in the direction of the user at an incredible speed:

Anti-kickback claws are mounted on the rear side of the blade cover and look like spiked claws that angle down and rest on the work piece.  As the piece is fed through the saw,  the anti-kickback claws act like little tiny hold downs that gently keep the work piece in place.

Rip fence – The rip fence is used to help guide pieces when making rip cuts.  The fence runs parallel to the blade and can be adjusted to the left and right, letting the user rest the work piece exactly where it needs to be as it’s cut by the blade.

Miter gauge – The miter gauge is used on the saw table in conjunction with miter slots to run work pieces at specific angles through the saw blade.  the miter gauge can be set from 0 – 90 degrees.

Bevel angle gauge – Most table saws are capable of cutting beveled angles, from 0 to 90 degrees.  the bevel gauge rotates the saw blade to the desired angle via controls usually positioned facing the operator of the table saw.

Blade height adjustment – Similar to the bevel adjustment, the control is usually located on the front of the saw facing the operator.  This adjustment allows the saw blade to be raised or lowered to facilitate cutting different heights of material.

So how do I use my table saw?

CAREFULLY!  Just kidding (but not really).  This is an incredible tool to have in your inventory.  As I stated, it is an excellent tool for making quick, precise work of repetitive cutting tasks.   That being the case, you do need to be cautious and very aware when using this powerful tool.

Always remember – safety first!

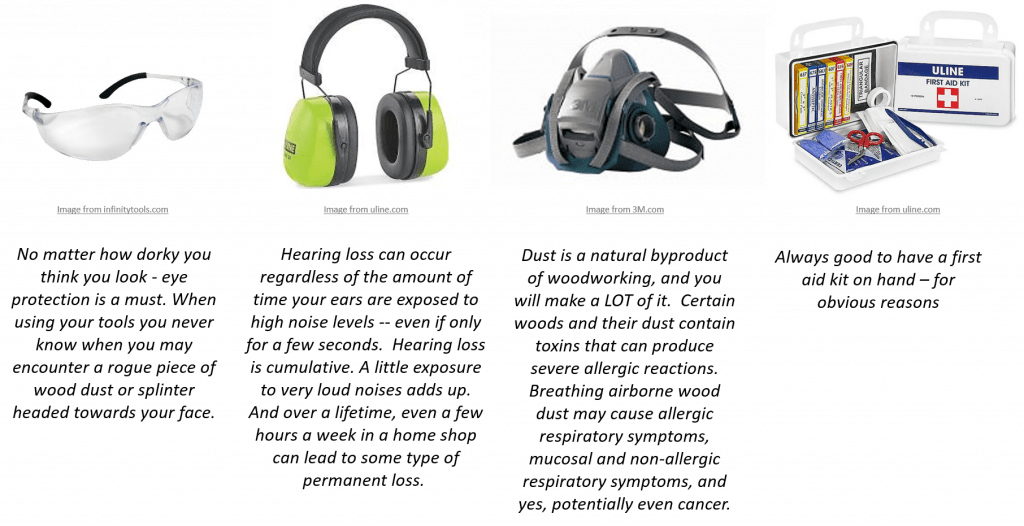
Wear hearing, eye and respiratory protection.  Your sending a piece of wood through a device spinning at 3 to 4,000 rpm (that’s roughly 123 mph).  Saw dust will happen, as well as the potential for flying wood chips.  Lets not forget the noise level:  100 decibels (sounds above 85 decibels are considered harmful).

Check the operation of the saw before you use it –  Make sure all the moving piece of the saw move freely.  Make sure the blade can easily raise and lower.  Make sure the fence moves easily.  Make sure the anti-kickback claws are in place and working.  Make sure your insert is in and secured properly.  Know your equipment and check it prior to use!

Never start the saw while the material you’re cutting is touching the blade.  Bad things happen when you don’t follow this rule.

Always use the rip fence when making “rip” cutsThis keeps your material straight and doesn’t allow it to wander on the table, potentially causing kick back from the blade.

Always use the miter gauge, not the rip fence, for crosscuts (the rip fence doesn’t offer adequate support).  Again, this is to prevent bad feedback or kickback from the work piece.

Keep material completely flat against the table during the cut.

Cutting blade heightI usually keep my blade about 1/4 of an inch higher than the material that i am cutting.  I do this so i can visibly see the action of the blade and it helps to ease chip removal for the blade as well as reduces blade friction.

Have and use push sticksA lot of artists sacrifice for their work – but this usually doesn’t mean their fingers.  Push sticks are devices that are either made, or purchased (some sometimes come with the purchase of a new saw) that are used to feed material through the blade of the table saw:

Making Cuts

Using various jigs, clamps, and stops, woodworkers can make a variety of different types of special cuts like dado cuts, compound angles, and rabbet joints.  Even though woodworkers can make these types of cuts on their table saws, woodworkers most commonly use the saw to make two basic cuts:

Ripping, the most common use of a table saw, involves cutting material to a specific width.

Crosscutting applies to cutting material to a specific length.

Below, I have provided links to two YouTube videos that provide step-by-step directions for using a table saw to make each of these common cuts.

Rip Cuts:

Cross cuts:

Some items to note:

When making your cuts, be sure to pass the work piece all the way through the saw blade.  if the wast material is large enough to move out of the way by hand, do so carefully, otherwise, wait to remove it until after you have shut off your saw.

For larger pieces, use an out-feed table.  An out-feed table is an empty table top exactly the same height as your table saw.  it it placed on the opposite side of the saw away from the operator, in the direction the cut pieces of material are going.

Ripping larger pieces can be tricky due to pieces being longer than the table saw itself.  often times this temps the operator to reach over the spinning blade to catch the material before it falls.  THIS IS BAD AND UNSAFE.

In order to cut longer or larger pieces safely, you must support the end of the board as it comes off the back of the saw.

This is where an out-feed table comes in.  These can be purchased in stores and online, along with out feed rollers and other devices to support this “out-feed” lumber. from my perspective, a better solution is to build a small table that’s the same height as your table saw. Or if room permits, build a permanent out-feed platform. Just make sure to support the lumber behind the saw so you’re not tempted to reach over the blade to catch it.


Hopefully this has provided you a good start to using your table saw safely.  Just remember to always be purposeful and aware when using your tools.

If you like this post, please consider signing up and getting notified when new posts are available.  In the mean time, go make something!

Beginner Woodworking First Project

Building a Box

For those of you looking for a good basic woodworking project, my suggestion would be to start with a box.  A box you say?  Why in the world would I want to start with a box?  Well, that is a great question that I am more than happy to answer.

Knowing how to make a box is a very necessary and basic skill.  Most projects created in your shop will be, believe it or not, some variation of a box.   It is the basic shape of almost every woodworking project.

In creating a box, you gain understanding in several key woodworking areas:


Steve Ramsey at Woodworking  for Mere Mortals has a great video on how to make a basic box:

The skills you will practice and hone as a beginner in creating boxes will apply to countless other projects you will create throughout your woodworking journey!


If you haven’t already, sign up at the bottom right of the page and get notified when new posts are available!


References:

www.woodworkingformeremortals.com

How to Make a Basic Box – and why you need to know how.

How to Set Up Your Wood Workshop

Establishing your woodshop

OK – so maybe this is a little misleading.  Each space a person has to work in is unique.  Many share similarities, but for the most part they are unique.  Understanding what kind of projects you want to do and the space available is a big consideration when determining how your shop needs to be set up.

That being said, you have decided to start woodworking, you understand the benefits and the commitment, and you have a good basic idea of the tools you will need to begin.  Now you need to set up your shop.

As the person using the space, YOU need to decide what will work best for you based on how you like to work.  The question is, what does that look like?  Fortunately, I have assembled some suggestions that will point you in the right direction that should help you get up and running pretty quickly.

Important Things to Consider

Before you begin, you need to know how much space you have to work with.  Knowing this ahead of time will help in setting your shop up, and help you answer the following:

    • Will your shop layout allow for your larger tools to be stationary (think table saw/band saw/router table, etc.), or will they need to be mobile/mounted for easy storage and portability?
    • How much storage you will need, and what type can your space support? Cabinets? Shelving? Both?  There is benefit to having your tools out in the open.  It is much easier to engage them when need and saves time.  However, if your desire is storage and out of sight, Saws on Skates has a set of free plans to assist in creating some pretty easy cabinets.
    • Power – will you need 110 and/or 220? Do you have any 20-amp outlets to support some of your larger power tools?  Are there outlets available?
    • Consider your workflow process – basically how you create and build. Organization of your primary tools around how you work should be a big consideration.  If you haven’t thought about this yet, that’s o.k.  As your skills grow, where you decide to keep primary tools in your shop with change as well.
    • Determine the size of your workbench based on space, then build or buy (I propose build – great first experience for tools and engages in the fundamentals of box building – Woodworking for Mere Mortals has great information on  understanding why and how to build a basic box).

How much space to do have to work with for my workbench?  There are lots of bench plans available for free on the web.  This one from build something.com has free plans and has casters for portability.

    • Lighting – Make sure you install bright lightning. Kasia at woodenpalletprojects.com recommends that the best choice for lighting would be LED light fixtures, not some fluorescent, old-style flickering lights. LED lights are much brighter and will save you dollars on energy bills. I’d recommend going for a warmer (more yellow) color temperature.
    • Clean up and dust collection. Maintaining a clean and clutter free workspace is not only important, it’s SAFE.  For smaller shops, in conjunction with your personal use of a dust mask or respirator, have you considered using a box fan with an air filter to remove particulate matter from the air?  How about using a shop vac to remove heavier debris from your tools and shop floor?

Example Garage Woodshop Layout

The image below comes from garagewoodwork.com.  The floor plan is a good example of the best use of space and organization in a small area:

image of a floor plan noting the layout of woodworking shop tools
www.garagewoodwork.com

Notice that the shop floor, even for such a small area, is kept relatively clear. Take note of how the tools are set up in stations.

The image above presents a good idea of how a shop can, and if possible, should be organized.

Speaking of Organization…

Here are a few tips to keep in mind when laying out how your space will work:

      • Tools that are used the most should be nearby. Items that would be used for assembly or on the work bench should be located at or close to those areas.  This will safe you time.
      • Clamps – should be easily accessible and nearby your assembly and/or workbench for ease of use.
      • Tape – its best to store these in a dispenser type of holder, making them ready for use when you need them. This is a great idea for a dispenser from Popular Woodworking Magazine.
      • Create a storage / charging station for drills, drivers, other battery powered devices like in the image below:
Image of a rack designed for holding battery powered tools
https://powertoolsonsale.com


      • Fasteners – create storage bins for containing various fasteners used for projects. Have this be a part of your assembly table for easy access.
      • Wood storage – Material that your going to use – store close to the entrance of your space, making it easy to unload and store.  For scrap, well, this can easily overrun your workshop if you’re not careful.  Every woodworker sees potential in every piece of leftover material.  My suggestion is to set some boundaries and move on.  I tend to get rid of everything with defects and is potentially too small to cut safely.  This is challenge is unique to each person.  I get it.  Just watch out – you can easily be swimming in leftover wood before you know it.
      • If you opted for a miter saw, and its going to be stationary, keep it near your lumber stock. Lots of woodworkers use the miter saw to cut down longer pieces of wood in addition to making angled cuts.
      • Notice in the image of the woodshop above that the table saw and the assembly table are centrally located in the space. If you have the room in your shop – you should do the same.

You’re going to be spending a lot of time in this space.  Set it up well, and reorganize it as your needs and skills change.

There are many other suggestions that can be made around shop organization and set up.  I believe that I hit on the big ones.  As I said before, how your set up your shop is unique to you, your working style, and the amount of space you have available.  Do some research and find things that look like they will work with the space you have.  Your shop will grow as you grow.


I hope this post helped point you in the right direction regarding some of the fundamentals of getting your woodworking space in order!  If there are things I didn’t cover, or additional items that you feel need or should be addressed, please feel free and leave a comment below and I’ll be sure to get back with you.  In the mean time, I have included some additional shop layouts available on Pinterest.

If you found this post or any of the other post interesting, engaging or helpful, click the subscribe button and  get notified when new posts come out!


References:


https://www.pinterest.com/pin/392024342534500798/
https://www.buildsomething.com/plans/PE2FB00363ABE263F/EasyBuildWorkbench
https://woodenpalletprojects.com/
http://www.garagewoodwork.com/garage-layout.php
https://powertoolsonsale.com
http://www.garagewoodwork.com/garage-layout.php
https://woodworkingformeremortals.com/how-to-make-a-basic-box-and-why-you-need-to-know-how/


A BEGINNER’S TOOL GUIDE

In my second post (you can read it here) I review items that should be taken into consideration prior to beginning woodworking.

One subject item we cover is the not-so-subtle topic of the financial commitment required to start this hobby.  Tools can be expensive.  I understood this going in, and you should too.  Expect to spend some money.

That being said, there are a multitude of tool options available to you that will allow you to begin your new hobby without breaking the bank.

Some words of advice:

Take stock of what tools you already have.  Most of us have collected some tools over the years.  Know what you have so you don’t go out and re-buy items.

You’re just starting out.  You don’t need the latest greatest.  Check places like CraigsList, LetGo, etc. to find great deals on gently used tools.  Remember – there is nothing that says all your tools have to be the same brand and color.

This is probably the best advice, and it comes from Steve RamseyOnly get a new tool if you need it to accomplish a task that can’t be done with your current tools.  Your wallet will feel much better, and you won’t crowd your workspace.

This list is based on my experience.   It is what I believe would have been helpful to me when I first began.  There are lots of these lists on the web, this is my idea of what a beginner needs and and should have to get started.  The list covers the basics, and with the tools listed, you should be able to cover a large amount of differing projects.

Beginner woodworker tool checklist
List of power tools a beginner woodworker should have to start woodworking

Click the image to download the list

POWER TOOLS

definition and image of a table saw
Table saws cut straighter lines and make smoother cuts on small and long boards.

Take a look at Woodsmith Spirit’s recommendations regarding table-saws for beginners is a great list for affordable table saw options

image of a jigsaw
Jigsaws are best used for cutting shapes and curves

TSawingpros.com has a list of some great starter saws that won’t break the bank

image of a miter saw
A miter saw is a specialized tool that lets you make cuts at a variety of angles.

A great list of Miter saws for the beginner can be found here

Image of a circular saw
circular saw is a hand-held, electric circular saw designed for cutting wood

Popular mechanics has a review of  corded saws.  For battery saws, there are power combo kits offered by several companies

Images of corded and cordless drills
A drill is primarily used for making round holes or driving fasteners

Similar to above, you can go corded, or cordless.  If you go cordless – consider it as a part of a tool-set.   I myself prefer the flexibility of cordless, and there are some great options available

Here is a list of quality corded drills for the price

Image of an impact driver
An impact driver’s main purpose is to drive large fasteners and long screws

popular mechanics has a great list of impact drivers rated by price & features

I chose the Ryobi based on the driver being a good mix of quality and price.  Again, as mentioned above, look for these as a part of a tool-set – it’s a much better deal overall

Image of an orbital sander
An orbital sander is a hand-held sander that vibrates in small circles, or “orbits.”

The architect’s guide has a list of orbital sanders, noting features & quality

My personal recommendation would be the Makita BO5041K 5.”  This sander has great features for the price point

image of a laptop computer
Use a PC or laptop to run a version of CAD software for your designs

All3DP has a great list of free 3D modeling software for beginners.  My personal favorite is Sketchup.  Its easy to learn and easy to use

SAFETY EQUIPMENT


A list of safety equiment - goggles, hearing protection, respirator and first aid kit
Shop safety equipment that should always be on hand

WORK SHOP ITEMS

These are the various items that you will need in your shop to assist you in measuring, fastening, tightening, and cleaning up while you create.


a list of additional shop relaated tools for woodworking
Additional beneficial shop tools

Obviously there are LOTS of options when it comes to the brand, grade and quality of the tools you choose to get.  Here are 3 things you need to do prior to, and during your first project:

Workshop saftey infographic
Take workshop safety seriously

Be safe, and as always, feel free to leave a comment or suggestion below regarding any of the content listed.


References:

Berendsohn, R. (2019, July 9th). The Best Budget-Friendly Circular Saws for Summer Construction. Retrieved from https://www.popularmechanics.com: https://www.popularmechanics.com/about/a28319503/best-circular-saws/?utm_source=google&utm_medium=cpc&utm_campaign=arb_ga_pop_d_bm_hp_a28319503&gclid=EAIaIQobChMIwLHvlfvZ6wIVT77ACh0QkQ8jEAMYASAAEgL7CPD_BwE

Ford, B. (2020, January 9th). The 11 Best Impact Drivers for Any Job. Retrieved from https://www.popularmechanics.com: https://www.popularmechanics.com/home/tools/a27887717/impact-driver-reviews/

Heidmann, L. (2020, July 6th). Incorporating Social Media Data into AI Strategy: Use Cases & Challenges. Retrieved from https://blog.dataiku.com: https://blog.dataiku.com/incorporating-social-media-into-ai-strategy

Hubbard, B. (2020, July 29th). The 10 Best Random Orbital Sanders. Retrieved from https://www.thearchitectsguide.com: https://www.thearchitectsguide.com/articles/best-random-orbital-sander

Jones, A. A. (2020, October 19th). Best Corded Drill for Any Type of Project. Retrieved from https://drillez.com: https://drillez.com/best-corded-drill/

K., A. (2020, August 27th ). New To Woodworking? These Are The Best Table Saws For Beginners. Retrieved from https://woodsmithspirit.com: https://woodsmithspirit.com/best-beginner-table-saw/

Khan, G. F. (2018). Sociam Media Vs. Conventional Business Analytics. In G. F. Khan, Creating Value with Social Media Analytics: Managing, Aligning, and Mining Social Media Text, Networks, Actions, Location, Aps, Hyperlinks, Multimedia, & Search Engines Data (p. 61). Seattle, Wa.: CreateSpace.

Mandich, J. (2020, May 19th). Best Miter Saw For Beginners in 2020 with Buying Guide. Retrieved from https://sawreviewer.com: https://sawreviewer.com/best-miter-saw-for-beginners/

Nerds, T. (2020). Best Power Tool Combo Sets in 2020 & Top Picks, Guide and Reviews. Retrieved from https://www.toolnerds.com: https://www.toolnerds.com/power-tool-combo-set/

Newton, K. (2020, July 15th). Best Budget Jigsaws under $100 – Reviews & Top Picks 2020. Retrieved from https://sawingpros.com: https://sawingpros.com/best-budget-jigsaws-under-100/

SawingPros. (2020, July 15th). Best Budget Jigsaws under $100 – Reviews & Top Picks 2020. Retrieved from https://sawingpros.com: https://sawingpros.com/best-budget-jigsaws-under-100/

Stuart. (2016, June 24th). Best Miter Saw for DIYers. Retrieved from https://toolguyd.com: https://toolguyd.com/best-miter-saw-for-diyers/

https://www.uline.com/Product/Detail/S-20706LIME/Hearing-Protection/Uline-Earmuffs-Lime?pricode=WB1365&gadtype=pla&id=S-20706LIME&gclid=EAIaIQobChMIxMrE6pHd6wIVTfDACh3OUQaSEAQYBCABEgJHS_D_BwE&gclsrc=aw.ds

https://www.3m.com/3M/en_US/company-us/all-3m-products/~/3M-Rugged-Comfort-Quick-Latch-Half-Facepiece-Reusable-Respirator-6503QL-49492-Large-10-EA-Case/?N=5002385+3294106819&rt=rud

https://www.dewalt.com/products/power-tools/saws/table-saws

https://www.boschtools.com/us/en/boschtools-ocs/power-tools-22064-c/

https://www.ryobitools.com/power-tools

https://www.portercable.com/products/power-tools

https://www.makitatools.com/products/search/sanders

https://www.3m.com/3M/en_US/company-us/all-3m-products/~/3M-Rugged-Comfort-Quick-Latch-Half-Facepiece-Reusable-Respirator-6503QL-49492-Large-10-EA-Case/?N=5002385+3294106819&rt=rud

https://www.uline.com/Product/Detail/S-20706LIME/Hearing-Protection/Uline-Earmuffs-Lime?pricode=WB1365&gadtype=pla&id=S-20706LIME&gclid=EAIaIQobChMIxMrE6pHd6wIVTfDACh3OUQaSEAQYBCABEgJHS_D_BwE&gclsrc=aw.ds

https://www.infinitytools.com/turbo-safety-glasses

https://www.harborfreight.com/25-ft-x-1-in-QuikFind-Tape-Measure-with-ABS-Casing-69030.html?ccdenc=eyJjb2RlIjoiMTg0NzMzNjkiLCJza3UiOiI2OTAzMCIsImlzIjoiMi4xOSIsInByb2R1Y3RfaWQi%0D%0AOiI5MTQxIn0%3D%0D%0A&cid=paid_google|||69030&utm_source=google&utm_medium=cpc&utm_campaign=&utm_content=&gclid=EAIaIQobChMIxLzs-7bd6wIVBdvACh2dngd1EAQYASABEgIQIPD_BwE

https://www.grainger.com/product/38WF34?gclid=EAIaIQobChMI7-vO0bjd6wIVUb7ACh2GEQBNEAQYAiABEgIBgPD_BwE&cm_mmc=PPC:+Google+PLA&ef_id=EAIaIQobChMI7vO0bjd6wIVUb7ACh2GEQBNEAQYAiABEgIBgPD_BwE:G:s&s_kwcid=AL!2966!3!264955915856!!!g!461779184354!&gucid=N:N:PS:Paid:GGL:CSM-2295:45Q7YX:20500731

https://www.harborfreight.com/pliers-set-6-pc-64729.html

https://www.homedepot.com/p/POWERTEC-3-in-Positioning-Squares-4-Pack-71123/307264372?source=shoppingads&locale=en-US&mtc=Shopping-B-F_D25T-G-D25T-25_1_HAND_TOOLS-Multi-NA-Feed-PLA-NA-NA-HandTools_PLA&cm_mmc=Shopping-B-F_D25T-G-D25T-25_1_HAND_TOOLS-Multi-NA-Feed-PLA-NA-NA-HandTools_PLA-71700000034127224-58700003933021546-92700049573927173&gclid=EAIaIQobChMIx5aLnb_d6wIVycDACh0akwz-EAQYAiABEgJHcPD_BwE&gclsrc=aw.ds

https://www.homedepot.com/p/WEN-3-in-x-2-in-x-1-in-Steel-Hardened-Precision-1-2-3-Gauge-Blocks-2-Pack-10423/308391064?source=shoppingads&locale=en-US&mtc=Shopping-B-F_D25T-G-D25T-25_1_HAND_TOOLS-Multi-NA-Feed-PLA-NA-NA-HandTools_PLA&cm_mmc=Shopping-B-F_D25T-G-D25T-25_1_HAND_TOOLS-Multi-NA-Feed-PLA-NA-NA-HandTools_PLA-71700000034127224-58700003933021546-92700049573927173&gclid=EAIaIQobChMI2Zziw7_d6wIVENvACh0oJQS7EAQYAiABEgLHd_D_BwE&gclsrc=aw.ds

https://www.harborfreight.com/14-gallon-wetdry-vacuum-56579.html?_br_psugg_q=shop+vacuum


How do I get started? What do I do first?

Where to begin…

Getting started can be daunting and downright overwhelming.  When I started out, I had no idea where to begin with anything – tools, workspace, or even projects.  I’ve combed through the internet and along with my own suggestions, here are the top ten things that I believe everyone beginning in woodworking should know:


SAFETY FIRST 

Whatever tools you have decided to start off with, know how to use them. Do not try and “learn on the fly.”  Understand how they work and the best ways to use them.  Don’t be afraid of them, but do respect them.

Always wear a respirator Dust is a natural byproduct of woodworking, and you will make a LOT of it.  Certain woods and their dust contain toxins that can produce severe allergic reactions. Breathing airborne wood dust may cause allergic respiratory symptoms, mucosal and non-allergic respiratory symptoms, and yes, potentially even cancer.

Always wear eye protectionNo matter how dorky you think you look – eye protection is a must. When using your tools you never know when you may encounter a rogue piece of wood dust or splinter headed towards your face.

Always wear hearing protectionHearing loss can occur regardless of the amount of time your ears are exposed to high noise levels — even if only for a few seconds.  Hearing loss is cumulative. A little exposure to very loud noises adds up. And over a lifetime, even a few hours a week in a home shop can lead to some type of permanent loss.  Protect your ears!  More info can be found here:  http://www.woodworkingtips.com/etips/etip43.html

BIG SHOP NOT REQUIRED

That being said, you do need some space. Understanding where you are going to work will help you to understand how you want to organize your space as well as how to store and use your tools.

I mount a lot of my larger stationary tools on stands and casters making them easier to access when needed and roll away when not.  We will get into some more specifics around shop setup in a later post.

UNDERSTAND THE FINANCIAL COMMITMENT

My goal with this blog is to help anyone looking to jump into woodworking do so in a way that is fun and affordable, while avoiding some of the pitfalls I have made along the way. One thing you need to understand is that woodworking can be expensive.  The supplies you will need from day to day (think, glue, sand paper, screws, finishes, tape, etc.) the tools you work with and the wood you will need, there will be some financial investment required.  Wood will be by far the most expensive thing you will purchase next to your tools. (Psst –  Craigslist is your friend)

YOUR FIRST PURCHASE SHOULD BE A TABLE SAW

This is usually the cornerstone tool for most woodworkers.  In any videos you watch on YouTube, if you pay attention, you will notice that most, if not all projects involve the use of a table saw to one degree or another.  A table saw allows you to make unique cuts that are difficult or impossible to be done with other tools.


THE BOX IS YOUR FRIEND 

While practicing with your recently acquired tools, first learn to build a basic box. The fundamental shape of most items in woodworking are variations of boxes.  Understanding how to build a simple square box will teach you a lot – from understanding how to take and make measurements, to calculating the lumber dimensions into your design, to how to join the pieces (you don’t need nails – wood glue is your friend) , to where and how to cut along the measurement marks you make on your pieces needing to be cut.

HAVE A PLAN

Having an initial design prior to starting any project in my mind is a must. This will save you time, money and aggravation.  There are several free 3D modeling tools available on the internet that as a beginner you can use to model/create your piece prior to making any cuts or marking any lines.  I found SketchUp to be my personal favorite and the tool I use to design my projects.  Its easy to learn and easy to use.  There are lots of YouTube videos showing you how to use the tool as well. A list of various free 3D CAD software can be found here.

TOOLS ARE NOT THE END ALL TO BE ALL

Opinions vary on this particular subject. In my limited experience, here is what I have found:

Buy only what you need – Sometimes more is just more. If you start collecting tools, remember – you have to have a place to store them.  Start off with the basics (we will cover this in a later blog) and add from there as needed.  Here is a great article discussing what is believed to be essential tools for the beginner woodworker.

Different brands offer different features – You’re in this to create, learn, and grow your skill. There are many brands that are not the top brands that offer quality tools at affordable prices that are perfect for getting you up and going.  Think Ryobi and Harbor Freight.  Also feel free to check Craigslist. I got my Jet JET Wood Lathe in virtually brand new condition for $150 (Listed new at almost $919!) There are LOTS of folks entering and exiting the hobby –  take advantage where you can!

Ignore the social media woodworking elite – A lot of these folks are sponsored and often times are happy to show off their new this or that to their audience. As cool as this can be, it can also be intimidating and discouraging.  Tools do not make the craftsman.  You are the artisan, not what you use.

There are also those that will claim that if you use screws or special types of joinery you are not really “true” woodworkers.  Personally I think this position is garbage.  If you can take wood and conform it to your will and design, making something from nothing, that makes you a woodworker in my book.  You don’t have to use ancient tools and techniques to do this.

SANDING IS MUY IMPORTANTÉ 

If there is one thing I have learned, it is this: slack off on sanding, and you will regret it.  Sanding helps remove surface imperfections as well as any left-over glue or rough edges.  These are all things that will show up later when you apply finish to your projects.  Take your time and do it right.

A lot of woodworkers won’t sand past 220 grit – knowing that they are going to apply a finish to their project.  My thought is this:  If you’re applying a finish, stop at 220.  If you’re using tung oil or linseed oil, go a little finer – to maybe 400 grit or smaller – where you stop depends on your personal preference.

YOU’RE NOT GOING TO BE PERFECT 

Face it – you are going to make mistakes. The good news is, through these mistakes you will learn how not to do things as well as how to do things.  Most mistakes on a project can be fixed with a little imagination and creativity.

Mistakes will hone your skills.  Don’t be hard on yourself and for Pete’s sake – don’t point out your project mistakes to others!   As a woodworker creating projects, you are among 1.6% of the U.S. population that are doing something that the vast majority of the country or world for that matter will never do – be proud of what you create!

PRACTICE, PRACTICE, PRACTICE 

You can watch as many YouTube videos and read as many how to articles as you want. If you don’t put the time into actually using your tools, refining your cuts and your techniques – you won’t improve.  In order to grow your skill, you have to practice!


Again, this list is just my perspective on things I wished that I had known from the beginning when I was starting out.  Hopefully this helps each of you get off the ground.  You will find that this list is probably similar to a lot of other lists other woodworkers have put together as well, which lends weight to the idea that these items are somewhat universal for beginners and important.

If you have questions, please feel free to ask!  If I don’t know, I’ll do my best to find out. As I have said before, I’m just starting out on this journey myself.  Feel free to come along for the ride!

Now, get in the shop and make some sawdust!

Woodworking | What’s keeping you from getting started?

My name is Tony…

I’ve become obsessed with building, restoring and creating furniture, gifts and other fun woodworking projects for the past ten years.

I am a novice.  My journey has been both fun and frustrating, but never ever boring!

I have looked for a place to ask simple questions, and to learn how to start.  Techniques.  How to hold a saw.  How to use a screw gun.  How to set up and start my shop.  What should be my first project?

I decided to create this blog as a place of refuge for those looking for answers, collaboration and comradery on their individual wood working journeys.

Here we will create an environment to answer answer questions from how to get started in woodworking to any and all woodworking topics on your mind.

If I know the answer, I’ll tell you, and if I don’t, we will find it together.

Together we will grow our skills.  You will see my successes, and my failures.  You will find woodworking plans, tutorial videos, and how-to’s on the way to help you build your skills as I build mine.  Hopefully, you will fill that innate desire to create something along the way!

Let’s get started!