
Issues
- Forms are a common way of submitting information on the web. Yet unless the form is coded properly, users of assistive technology may not be able to decipher what information is being requested.
- Many people use the tab key to navigate a form so the form must be keyboard accessible.
Solutions
- Most accessibility issues can be addressed by logical organization of forms and use of the <label> and <fieldset> tags.
- Make sure the tab order follows the form.
Caution:
Javascript can cause a number of accessibility issues. Make sure your form operates within assistive technology, as well as being keyboard functional.
Form techniques
- Tell users what the form is for.
- Keep the form as simple as possible.
- Place labels adjacent to input fields (just above or just to the left) – if someone is using a screen magnifier it is important that the label is close to the field.
- A common way of going through a form is using the tab key – make sure your tab order follows the form.
- Caution: Make sure that the label is close to the field in the display AS WELL AS the html code. If your form is in a table and the label and field are adjacent fields – they may appear close together but the Assisstive Technologies may not read them together.
- Use aria-required for required fields — aria-required=”true”
Form Validation
- If using client-side validation, the validation and submission process must be keyboard accessible.
- Do not rely on JavaScript alone for form submission, validation, and error recovery.
- Use ARIA markup for error handling including aria-invalid on fields which have errors and use alerts or alert dialogs for announcing the errors.
- Error Recovery keep the following in mind:
- Alert the user to the presence of the error in an apparent and accessible manner.
- Allow the user to easily access the form elements that need to be modified.
- Allow resubmission and revalidation of the form.
Labeling Form Controls
Use the <label> element to label these form controls:
- Text Fields
- Radio Buttons
- Checkboxes
- Select Menus
Other form elements, such as buttons, are already associated with a label. These do not need to use the <label> element.
Place labels adjacent to input fields. The reason for this is if some one is using a magnifier, it is important that the label is as close to the control as possible. Only small sections of the screen can be magnified, so it’s good to make sure that the control, as well as it’s label, are visible.
It’s not enough to place the label adjacent to the control. A screen reader needs to know programatically which label is assigned to which control.
Make this programatic assignment using the “for” attribute on the <label> element, and the “id” attribute on the control in question.
If using a label is not possible because of something like space (think the second line of addresses here), use the title attribute on the control. This technique should only be used as a secondary technique. Screen readers first look for the <label> tag.
Labeling Text Fields
Associate labels to controls. Note the use here of the “for” and “id” attributes.
 <form action="mailto:somebody@knowbility.org">

<label for="namelabel">Name</label>

<input name="name" id="namelabel" size="30" aria-required="true" /> <em>(Required)</em>

<label for="emaillabel">Email</label>

<input name="email" id="emaillabel" size="30" />

<label>Dog's Breed</label>

<input name="dogbreed" size="30" />

<input type="submit" value="Submit" />

</form>
The form:

Labeling Radio Buttons
The idea of using the “for” and “id” attributes is the same. The idea is still to associate a label with it’s control. This form expands on the previous one, but now the dog’s breed is set with a radio button.
<form action="mailto:somebody@knowbility.org">

<label for="namelabel">Name</label>

<input name="name" id="namelabel" size="30" />

<label for="emaillabel">Email</label>

<input name="email" id="emaillabel" size="30" />

<label>Dog's Breed</label>

<input type="radio" name="dogbreed" id="lab" />

<label for="lab">Labrador Retriever</label>

<input type="radio" name="dogbreed" id="tfox" />

<label for="tfox">Toy Fox Terrier</label>

<input type="radio" name="dogbreed" id="mutt" />

<label for="mutt">Mutt</label>

<input type="submit" value="Submit" />

</form>
The form:

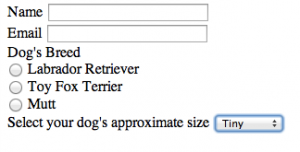
Labeling Select Menus
The idea of using the “for” and “id” attributes is the same. The idea is still to associate a label with it’s control.
This form expands on the previous one, but now we’ve added a menu to select the dog’s size.
<form action="mailto:somebody@knowbility.org">

<label for="namelabel">Name</label>

<input name="name" id="namelabel" size="30" />

<label for="emaillabel">Email</label>

<input name="email" id="emaillabel" size="30" />

<label>Dog's Breed</label>

<input type="radio" name="dogbreed" id="lab" />

<label for="lab">Labrador Retriever</label>

<input type="radio" name="dogbreed" id="tfox" />

<label for="tfox">Toy Fox Terrier</label>

<input type="radio" name="dogbreed" id="mutt" />

<label for="mutt">Mutt</label>

<label for="dogsize">Select your dog's approximate size</label>

<select id="dogsize" name="dog_size" size="1">

<option selected value="">Tiny</option>

<option value="small">Small</option>

<option value="medium">Medium</option>

<option value="large">Large</option>

</select> </form>
The form:
Labeling Checkboxes
The idea of using the “for” and “id” attributes is the same. The idea is still to associate a label with it’s control. This form expands on the previous one, but now we’ve added a question about subscribing to a magazine.
 <form action="mailto:somebody@knowbility.org">

<label for="namelabel">Name</label>

<input name="name" id="namelabel" size="30" />

<label for="emaillabel">Email</label>

<input name="email" id="emaillabel" size="30" />

<label>Dog's Breed</label>

<input type="radio" name="dogbreed" id="lab" />

<label for="lab">Labrador Retriever</label>

<input type="radio" name="dogbreed" id="tfox" />

<label for="tfox">Toy Fox Terrier</label>

<input type="radio" name="dogbreed" id="mutt" />

<label for="mutt">Mutt</label>

<input type="checkbox" name="magazine" id="dogmaglabel" />

<label for="dogmaglabel">Subscribe to Dog's Quarterly?</label>

<input type="submit" value="Submit" />

</form>

Grouping with the fieldset element
The fieldset element is used to group controls such as radio buttons. In conjunction with the legend element, this provides a screen reader user with more context.
<fieldset>

<legend>Dog's Breed</legend>

<input type="radio" name="dogbreed" id="lab" />

<label for="lab">Labrador Retriever</label>

<input type="radio" name="dogbreed" id="tfox" />

<label for="tfox">Toy Fox Terrier</label>

<input type="radio" name="dogbreed" id="mutt" />

<label for="mutt">Mutt</label>

</fieldset>

<input type="submit" value="Submit" />

</form>
Now, when a screen reader user tabs to this group of radio buttons, they will always hear “dog’s breed”, followed by the rest of the information on the radio button.
The form:

Class Example
Class Example (Before, Problems, After)
WCAG 2.0 Guidelines
1.3.1 Info and Relationships: Information, structure, and relationships conveyed through presentation can be programmatically determined or are available in text.
Suggested Tools to check forms
- Listen to the table with a screen reader. Can you follow the flow of information?
- Wave Toolbar – Errors, Features and Alerts
- Jim Thatcher’s Favelets – Form Labels